When we're done it should look like this with part one and two added.
We started with a basic pattern for the corner of our building. Using peaks on the windows fits in with the Warhammer 40k world better than squares. The same goes for peaks on the top. You can break off the wall at any height or width you prefer. Ours is 3 stories tall at the highest and five windows wide
For the cuts on the edges, these are walls that have been "blown up" so don't worry if you need to tear things off. The rougher the cuts look the better the paint job will look.
For corners, trim off the thickness of the foam-core from the facing and the foam. Be careful not to cut through the backing. Apply a bead of hot glue down the corner and press the two parts together. You can use pva or craft glue but you'll need to leave the pieces to dry before proceeding. The hot glue dries solid, quick and a good way to keep your project rolling.
Next get hold of some press board, we used a cereal box. Cut strips the height of your structure and about 1/4 inch wide.
Glue those strips vertically between the windows. We cut door frames too and placed them in the gaps where we left windows out. We cut a 12 inch square piece of MDF board for our base.
We took leftover pieces of foam-core and insulation foam broke them up and used them for rubble. We added some of the sprue sticks we made in the last "How-To". Use hot glue for the large chunks.
We added piles of coarse ballast and "bits" we also made in the last tutorial. For these we used regular pva or craft glue. Spread as much or little as needed to secure the piles.
Here's what we have so far. Good pile of rubble where the floors would have collapsed into.
From the air it looks like so.
Now onto the painting. We had some latex paint with sand and ballast already mixed in but wanted to add more for the rubble.
Using a large brush, start applying it liberally in all areas.
Coat the fronts of your buildings too. Use vertical strokes so when you do the final painting steps it'll look great.
Once everything is coated and dried, we applied a coat of black primer to finally seal everything in.
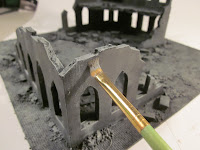
Next, using a 1/2 inch brush apply a heavy dry-brush of dark gray
Apply to all sides...
Then continue with a heavy dry-brush of medium gray..
Then add slate gray....
When doing the buildings, use vertical strokes from the top down and especially under the windows.
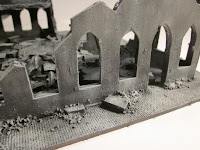
This is where the weathering affects add to your terrain piece
We added a coat a light gray dry brush over most of the structure and then a light dry-brush of warm white over the very tops of debris and where weathering would be the heaviest like near the top of the building.
Here's the final dry-brush coat applied.
The rubble details come out with the final bright touches of warm white.
We feel it's lookin good from the back.
For the final touches we added splashes of Burnt Umber wash where any mud might be along the base.
So here it is. A beautiful piece of terrain to go along with your statue, courtyard and barricades.
Now you can use it as an ideal spot for your Tau Pathfinders..
Somewhere where a lone Blood Angels Sergeant can hold out against a horde of greenskins
With the new allied rules you can have a last remnant of a Space Marine squad and Dreadnought join up with a few Tau Pathfinders and Stealth team.
So now go have a great battle!
The Old Crow


This is a great tutorial! I think I'm going to be utilizing many of these techniques on my own board.
ReplyDeleteThanks Euen! Glad the tutorial helped, always appreciate hearing from readers of the blog.
DeleteWe added another terrain piece for Warhammer 40k, check out the Bunker! http://battlegroundhobbies.blogspot.com/2012/07/how-to-build-bunker-for-warhammer-40k.html
ReplyDeleteThe Old Crow
Wow, what a great tutorial. Going to be bookmarking this site for my modular gaming table.
ReplyDeleteWhere did the statue that you used to finish off the piece come from?
ReplyDeleteHi Cole, Watch for sales at your local Walmart or check at garage sales for old action figures. The statue project can be seen in an earlier post, http://battlegroundhobbies.blogspot.com/2012/06/warhammer-40k-terrain-how-to-part-one.html
DeleteOops should have done some more reading lol. Thanks a lot. I might give that a shot one day if ever my circle of friends finds a need for a statue. Excellent tutorials by the way!
Deletenew to building what material should i use for the base of my building? btw love the work on this piece.
ReplyDeleteThanks Jeff! You can pick up hardboard at Home Depot or similar store. If free is better, you can find an old framed poster or the backs of old dressers and desks is the same stuff. The board for these bases was from a dresser.
Deletewhat is the material?
ReplyDeleteWe used a black foam core board. Very easy to cut and you don't have to worry about missing a bit here and there with your paint. With white foam core you need to make sure everything is covered.
DeleteFantastic tutorial, thank you very much for that! :)
ReplyDeleteWhat kind of paint do you use after applying the black primer? I guess for that much of paint needed the acrylic paints from Citadel are much too expensive.
Yes, Citadel paints are best saved for your figures! Any liquid acrylics from the hobby or craft store will do. We use the Folk Art brand from Plaid and Americana brand from DecoArt. They are cheap and readily available.
DeleteAlright, thanks! :) I'll check then my local craft store for acrylic paints.
DeleteLove this disign! I am haveing trouble with the spacing of the wins and floors. Do you mind sharing your measurements for one wall?
ReplyDeleteSure, the base of the large wall is 6in wide, each window is 5/8in wide with 1/2in between each window. Each outer lip is 3/8in from window to outside edge. Each window is 1 1/2in tall, from ground to sill is 5/8in and from top peak of window to sill of second story window is 3/4in.
DeleteHope that helps. Let me know if you need anything else!
Great work
ReplyDeleteThanks!!
DeleteI found this today and attempting my own buildings.. given the size, I’m assuming you didn’t use GW paints for the drybrushing? What did you use?
ReplyDeleteYou can get the liquid acrylics at craft stores and places like Walmart. The Plaid Folk Art brand is good enough for all the terrain projects. You can get sets like yhis one but usually we just buy individuals as we need them. Cost effective too!! Usually between 1-2.00 https://plaidonline.com/products/folkart-multi-surface-metallic-acrylic-paint-8-c
DeleteGuess i could have read the previous comments but thanks anyways!! I’m in Canada but my local Walmart had that brand of paints so I picked up what I could, wish me luck.
ReplyDelete