Thursday, November 28, 2013
How To: Build an Artillery Emplacement - Part One
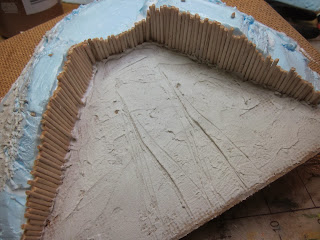
We did artillery the last two posts so today we'll show you how to build an emplacement for your artillery whether it be Steampunk, Fantasy, Historical or 40K. We started with 1/2 in polystyrene scraps which were cut to a rough shape.
We shaved them down with a utility knife and glued the top pieces and pinned them with toothpicks for extra strength. The base is a square of MDF board.
Next take round toothpicks and cut them to various but similar lengths. Measure the height of your foam to make sure the sticks are the correct height.
Then glue the sticks onto the interior of the artillery emplacement. The various heights will add to a more authentic look.
Work your way around until the entire area is covered.
For the ground we used joint compound and mixed some craft glue into it to add to the durability.
To create chewed up ground from moving the canons around we drug a finished one through the wet joint compound.
And a final building stage we placed additional joint compound on the foam seams and glued heavy ballast on for the painting stage. Next post we will do painting and detail work.
Have a Great Battle!
The Old Crow
Friday, November 22, 2013
Old Glory Dwarf Canon for Warhammer Fantasy Dogs of War
Old Glory miniatures have been around for a good while and if you're looking for a deal they might fit the bill. Old Glory is also one of the few scale model makers located here in the states. In the old days Warhammer supported Dogs of War armies and many Regiments of Renown. One of these was a light caliber mobile canon called Bronzio's Galloper Guns. They were excellent models but are out of print and may be expensive to find on eBay or other venue.
However if you have a friendly gaming club that allows you to play old school, Old Glory makes a dwarf horse canon that fits the bill. This model is a smaller canon than most dwarven artillery and comes with the horse and a crew of four. We left the horse out of our photo, sorry. We also swapped out the smaller metal wheels for larger plastic spares we had available.
Here we started basing the cannon with black and used Burnt Umber on all the woodwork. The dragon heads were painted with a base of Burgundy.
A lighter coat of Raw Umber was then applied to all the woodwork.
Last step for the wood was a light drybrush of Territorial Beige. The metalwork was given a coat of Antique Bronze and drybrush highlights of Pure Bonze.
The steel shod wheels were painted first with Gun Metal and then highlighted with Aluminium.
 The canon barrel was painted with Pure Bronze.
We then applied a black wash to bring out details and last touches of highlights to the woodwork and metals.
The crew consists of a pirate captain and three stout dwarf warriors. Here they are with base coats and most details applied.
Finally based and in their "Old Glory". Maybe next time we'll show you how to build an artillery emplacement for any of your cannons.
Have a Great Battle!
The Old Crow
However if you have a friendly gaming club that allows you to play old school, Old Glory makes a dwarf horse canon that fits the bill. This model is a smaller canon than most dwarven artillery and comes with the horse and a crew of four. We left the horse out of our photo, sorry. We also swapped out the smaller metal wheels for larger plastic spares we had available.
Here we started basing the cannon with black and used Burnt Umber on all the woodwork. The dragon heads were painted with a base of Burgundy.
A lighter coat of Raw Umber was then applied to all the woodwork.
Last step for the wood was a light drybrush of Territorial Beige. The metalwork was given a coat of Antique Bronze and drybrush highlights of Pure Bonze.
The steel shod wheels were painted first with Gun Metal and then highlighted with Aluminium.
 The canon barrel was painted with Pure Bronze.
We then applied a black wash to bring out details and last touches of highlights to the woodwork and metals.
The crew consists of a pirate captain and three stout dwarf warriors. Here they are with base coats and most details applied.
Finally based and in their "Old Glory". Maybe next time we'll show you how to build an artillery emplacement for any of your cannons.
Have a Great Battle!
The Old Crow
Thursday, November 7, 2013
How To: Steampunk Artillery for IHMN or Warhammer 40k
Welcome to November and our How To tutorial on Steampunk artillery. This project was designed for "In Her Majesty's Name" but could easily work with your Warhammer 40k Imperial Guard Forces on some dirt ball planet. It uses a good amount of recycled computer and printer parts plus old leftover copper wire.
The main base is a 1972 Tootsie Toy Howitzer which you can find at garage sales or eBay for a buck. This one was found in an old box hidden in an ancient antechamber.
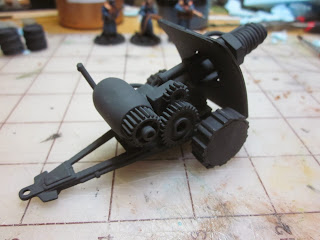
We found a smattering of gears that fit well including the "wheel" with the gear on the end to be our tank. We arranged them in a way that would work if a real item. A key to good Steampunk projects is they should look like they'd work. A small square "gear box" was used behind the gears s a spacer.
On the other side a piece of copper wire was inserted into the tank and positioned upwards for our steam vent. A second piece of wire was positioned to power the gun.
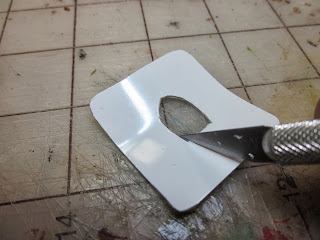
We planned a shield for the cannon and used a chunk of plasti-card measured to fit across the front. A hole was cut in the appropriate shape to slide over the barrel. A second piece was cut as a reinforced edge
For the tire treads we found these belts from an old dot matrix printer being trashed.
We turned them inside out and the paper guides were shaved off using a hobby knife. Then the two pieces were cut to the circumference of the wheel and glued onto them. We used a dremel to shave some of the roundness from the wheels. Being flatter will help the glue hold. Also get a piece of masking tape to hold the ends together while the glue dries.
Using cardstock we cut two circles to cover the wheels. For the barrel we cut a section of a drinking straw and wrapped a thin gauge wire around it. A nut slid over the whole lot to pull it together.
On the wire side a third piece was attached to a recess on the canon and bent to travel up along the barrel, over the nut and onto the front.
Here she is primed and ready to paint.
We used "Metallic Gunmetal" on the front shield, the carriage, wheels and parts of the barrel. most areas did not get a heavy coat so the black primer would show through and look weathered.
The tank and wires were painted with "Metallic Copper"
Next the gears were painted with "Antique Copper"
Final touches including the nut on the barrel and parts of the carriage were painted with "Pure Bronze"
Highlights on the Gunmetal surfaces were painted using "Aluminium"
To dirty things up for the worn look, a spotty wash of "Black" was applied . This was done mainly in the recessed areas.
The shield was given an extra dose of black wash especially under the gun barrel.
Last was a patina of "Laguna" on the copper areas .
There you have it! Our Steampunk Artillery is primed and ready to fire.
The Bucharest Brigade stands by waiting for the word to open fire with their Arc Canon!.
Have a Great Battle!
The Old Crow
Subscribe to:
Posts (Atom)


