I originally wrote a similar post on how to build the Leaping Wolf Inn on another blog, but thought it would be better suited here on Battleground Hobbies. We were looking for a Warhammer centerpiece to build a game about on the battleground and decided a fortified inn would fit the bill perfectly
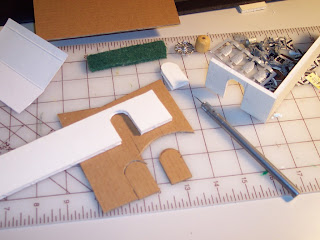
We started with the basics, foamcore, cardboard and lots of bits. Add a trusty x-acto knife, ruler and a little imagination and away we go.
 We had a couple plastic roof tops from an old toy laying around in our parts bin so we scaled things to match. It's a touch smaller than the 28mm scale but works sufficiently for games. The base was cut from the a piece of hardboard. We cut the doorways from cardboard and trimmed out the foam to slide in them in place. The main building is a heavy card stock from some computer part packaging.
Once the walls were glued on the base, the gate door is slid into place in the outer wall opening.
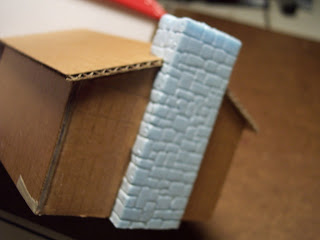
Using cardboard from an old Dell computer keyboard box we fashioned the back of the inn, servants hut and the stable. Blue insulation board was cut and scored with a pencil to make the stone chimney
This is a detail of the stable being assembled. You can use any balsa wood or in this case, the stick from a small firework, for the pillars.
Here's the Inn assembled with all the structures. Now we need to add final touches, a coat of paint and all the "flair".
The wood slats on the back of the inn and slate shingles were cut from an empty box of "Madagascar Red" tea we recently finished. The shingle pieces are 3.5 inches long and .5 inches wide. Notches were cut from the edge in narrow V shapes approx. .25 inches deep. They were overlapped to form the rows of shingles. Individual shingles were cut and overlapped to build the ridge along the top.
The Inn roof was painted black and then brushed with terra-cotta. The inn itself was painted tan with washes of burnt sienna and black added for weathering. The slate roof was also painted black and then dry-brushed in medium and light gray.
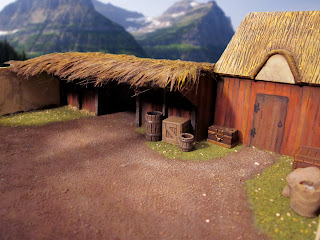
Fur was glued onto the stable roof and the brushed down with a mixture of white glue and water. Once it dried layers of dry-brushing were used to make it appear as straw.
Sand was mixed with glue on the base and also dry-brushed to show the texture. Blended turf and tan ballast, from Woodland Scenics, was mixed and glued to the base for the grassy areas.
I believe that's Ned Hamfist holding the standard.
Over view of the front with the stable and servants quarters visible out back.
One more with the courtyard and guests of the inn.
Here's a good view of the inn sign that was added and painted. It does say leaping if you squint.
 We had a couple plastic roof tops from an old toy laying around in our parts bin so we scaled things to match. It's a touch smaller than the 28mm scale but works sufficiently for games. The base was cut from the a piece of hardboard. We cut the doorways from cardboard and trimmed out the foam to slide in them in place. The main building is a heavy card stock from some computer part packaging.
Once the walls were glued on the base, the gate door is slid into place in the outer wall opening.
Using cardboard from an old Dell computer keyboard box we fashioned the back of the inn, servants hut and the stable. Blue insulation board was cut and scored with a pencil to make the stone chimney
This is a detail of the stable being assembled. You can use any balsa wood or in this case, the stick from a small firework, for the pillars.
Here's the Inn assembled with all the structures. Now we need to add final touches, a coat of paint and all the "flair".
The wood slats on the back of the inn and slate shingles were cut from an empty box of "Madagascar Red" tea we recently finished. The shingle pieces are 3.5 inches long and .5 inches wide. Notches were cut from the edge in narrow V shapes approx. .25 inches deep. They were overlapped to form the rows of shingles. Individual shingles were cut and overlapped to build the ridge along the top.
The Inn roof was painted black and then brushed with terra-cotta. The inn itself was painted tan with washes of burnt sienna and black added for weathering. The slate roof was also painted black and then dry-brushed in medium and light gray.
Fur was glued onto the stable roof and the brushed down with a mixture of white glue and water. Once it dried layers of dry-brushing were used to make it appear as straw.
Sand was mixed with glue on the base and also dry-brushed to show the texture. Blended turf and tan ballast, from Woodland Scenics, was mixed and glued to the base for the grassy areas.
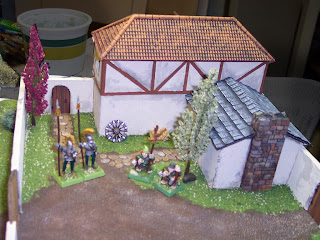
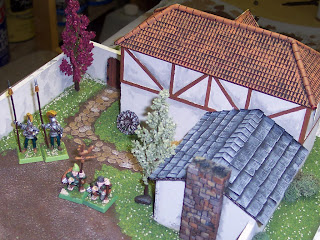
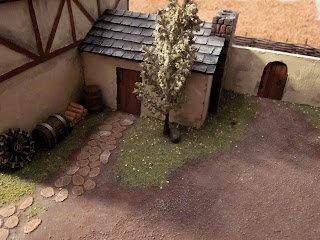
Small pieces of card-stock were cut to represent stones for the pathway. Bits like the wheel, trunk and firewood stack were added. The trees were part of a plastic plant purchased at Michael's for $1.50. I yanked the "flowers" off and have about a dozen small trees.
Inside the finished courtyard, you can see the chimney stonework . We added some Alcatani pikemen and a couple of Lumpin Croops halflings for scale. I believe that's Ned Hamfist holding the standard.
Over view of the front with the stable and servants quarters visible out back.
One more with the courtyard and guests of the inn.
Here's a good view of the inn sign that was added and painted. It does say leaping if you squint.
Please let us know what you think of the Leaping Wolf Inn. On a future post we'll relay a battle report that'll take place around it!
Have a Great Battle!
The Old Crow






Great tutorial and the finished product is nice. Thanks for sharing.
ReplyDeleteThanks Drew, we always appreciate comments.
ReplyDeleteThat inn is awesome! Great Job. Love the details.
ReplyDeleteThanks Royos! We enjoy hearing from readers!
Delete