If you have a rough game of Warhammer where the opposing force has a castle, a siege tower is a necessity. After starting our own castle it was apparent we’d need some good siege equipment to lead the attack. We thought a good battering ram would be handy, definitely a catapult or trebuchet and lastly a siege tower or two.
Cardboard was plentiful, so the siege tower began. We took several measurements, wall height, archer height and base width etc. The tower would need to be tall enough to drop invaders off on the wall and provide cover fire for a successful storming of the castle!
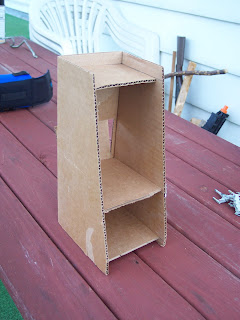
The side walls are 10 inches tall, 5.25 inches wide at the bottom and 3 inches wide at the top. It measures 4.25 inches across the front.
We cut the sides at an angle to provide a wider base and once the outer wall was in shape we cut 4 floor pieces. The first for the base, the second for the men attacking once the tower door dropped, third for the first level of archers and then the top for another supporting rank of archers. We cut out the door and one window the width of the tower for the arrow slits. Don't bother trying to cut out each arrow slot, we'll take care of that in the next step.
Remember to measure twice or even thrice and then cut. Once the floors were glued in, Elmers or craft glue will work, we could start the covering. Remember, always check your measurements before the glue gets applied.
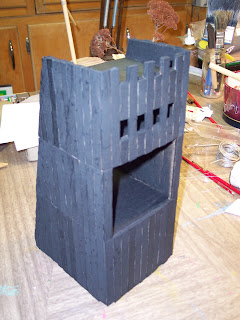
We cut three successive levels of craft sticks to size with a hobby knife and cut chunks out of the sides to give it a less uniform appearance. We glued tall vertical craft sticks over the one window to form the arrow slits in the middle of the tower.
Cutting the angles can be difficult, be careful not to split the sticks, but if you do hang onto them for now. Use several light successive cuts to score the stick and eventually you’ll get through it.
Balsa wood can be used in place of the craft sticks and is easier to cut. Balsa will also cost you a bit more. Remember knives can cut through a finger pretty cleanly. Have a friend that knows first aid over just in case.
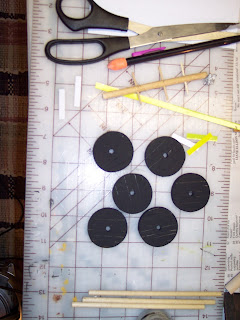
On to mobility. We planned three large wooden wheels shod in iron bands for each side. We found some 1.5 inch wooden disks in a bargain bin at a local craft store and decided they were the perfect size.
We took the craft stick pieces and cut some additional ones. Glue them side by side on the disks.
Using the hobby knife score the sticks from around the back of the disks to create the basic wooden wheel.
Measure the thickness and circumference and using a thin card-stock , we used a box from the Madagascar red tea we just finished, wrap it around your wheel and thoroughly glue it on.
Using a drill we cut holes in the center of each wheel for the axles which were cut to size from a long dowel.
Here they are primed and ready to be attached.
For the door to drop open, we glued on a coffee stirrer and pinned it in using round toothpicks so it would fall open. Screw a couple tiny eyelets onto the inside beam of the door for the “chain” to hold it in position. A couple more on the bottom of the floor above allow it to pull up to a closed position. I scored a great little piece of technology while recycling some old electronics which had two spindles with thin copper wire. We ran the copper wire through the top eyelets and attached them to the door. This allows us to crank the door up and down.
After everything was ready we primed it all black. Successive layers of browns were brushed on starting with burnt umber, then coffee bean and finally nutmeg.
Highlights were dry brushed with beige along the edges.
Now we load it up with attackers, deliver them safely onto the wall and storm the castle!!
As you can see in our cover shot, the orcs have brought along a giant to assist in moving the tower. Here is a nifty view of the back of the tower. The bottom two levels have the orc boyz loaded and ready for action. The top two levels have supporting ranks of archers.
Onto the walls!!
Drop us a comment and let us know how you liked this tutorial.
Until next time,
Have A Great Battle!
The Old Crow


Nice tutorial - thanks.
ReplyDeleteFrank
http://adventuresinlead.blogspot.com.au/
Thanks Frank, Glad you found it enjoyable!
DeleteThats really cool
ReplyDeleteHey Greg! Thanks for checking out the blog.
DeleteHi. How high is each story of the tower?
ReplyDeleteYou can make them any height, whatever fits best with your figures and castle walls if you have one.
DeleteOur tower is 3" from the bottom to the second floor, from there to the third is 3.5" mainly due to the height of the tower door, the next top floor is 2" above. This height was set to make sure the archer figures would fit.
Hope that helps, let us know how it goes!
what is inserted in the sides in photo 10
ReplyDeleteIf you are referring to the hinges, it is a coffee stirrer and we glued round toothpicks in the side of the tower. Put them in first. Once dried, stick tje stirrers onto the toothpicks and then glue them onto the door.
ReplyDeleteLet me know if that helps!
Thanks
Thanks I used this diagram for a school project
ReplyDeleteGlad to hear Tom! Hope it worked out. Send a picture or two of your completed tower
DeleteWhat did you use for the axle for the wheels?
ReplyDeleteYou can use any size dowel from your local hobby or craft store. 3/16 or 1/8 inch would work well. Any round stick would do the trick!
DeleteI don't have a coffee stirrer. What alternatives can I use for the hinges?
ReplyDeleteyou could try a regular straw, toothpicks and wire or just stop by any place that serves coffee and liberate a stirrer.
Deletewhat paint type and colour did you use?
ReplyDeleteLiquid acrylics are always good to use. You can pick up 2 fl. oz. bottles at any craft store for 2-3.00 dollars a bottle. Plaid makes a Folk Art line and DecoArt Americana are both fine to use.
DeleteCheck our fence tutorial for three step basics: http://battlegroundhobbies.blogspot.com/2013/10/how-to-build-scale-wooden-fences-for.html
Could you please make a tutorial video for this.
ReplyDeleteThank you. It's great! My son used your ideas for historical school project. Something was difficult and I helped him. He did this nice siege tower and trebuchet.
ReplyDeleteI'm really happy it helped!!
DeleteSend us some photos to battlegroundhobbies@gmail.com
and we can post them on our blog!!
I've sent you some photos of our siege engines. We also did a battering ram. There are plastic knights from my childhood on the photos. They were made in the mid 1970s.
DeleteHi, check our most recent post, your son should like it!!
Deletehttps://battlegroundhobbies.blogspot.com/2018/11/reader-built-trebuchet-siege-tower-and.html