 We showed you how to build a simple log ram earlier in this siege series, now we are going to build a larger carriage mounted battering ram for bashing your way through castle walls!! It will be a basic A frame with an extended canopy
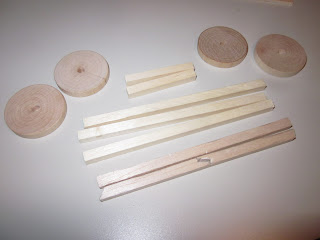
We started with a 36 x 1/4 inch hobby stick. You can easily use balsa wood too. We cut it into five 5 inch lengths and two 2 inch lengths. We also used four 1.5 inch wooden circles with 1/8th inch holes drilled in them.
Two of the sticks will be cut for the uprights. Measure 2.5 inches for the center and out approx 1/8th inch to each side. cut this angle for meeting the base. then cut an approx check mark from the opposite end as you see in the image above.
Now to assemble the base for your battering ram's carriage. Glue the 2 inch length sticks inside two of the 5 inch ones. You can use your hobby knife to cut grooves and notches into the beams for realistic texture.
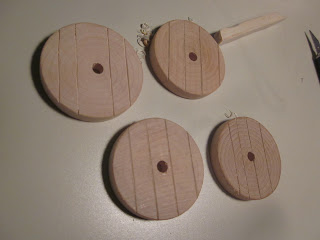
Next, cut horizontal lines onto all four of the wheels. These notches will give the appearance of wheels assembled from planks.
Now the uprights. Glue the bottom angles onto the longer stick just behind the crossbar. Make sure the check marks face inside so they can seat the top stick of the frame as you see here.
Lets move on to the canopy supports. They will extend from the uprights at an upward angle. Our longest dimension on the short supports was approx. 3/4 of an inch. The angles can be cut to your liking, we used a slight 80 degree and the opposing side is approx 65 degrees. The canopy supports are 1/4 x 1/8 inch boards cut to approx 1.75 inch length with angles on one end of each.
They will be assembled as this image. We glued the short supports onto the long ones before attaching them to the main structure.
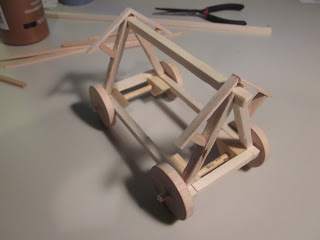
Here you can see the supports attached to the battering ram carriage. If the angles do not quite meet the glue can fill the gaps and hold it all together.
Here is the completed carriage that will hold the ram and canopy. We used supports to hold our axles 1/8 inch dowels. This will allow it to roll along. You can just as easily glue the dowels right to the carriage base.
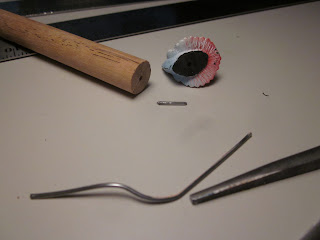
Next, you'll need a suitable head for your ram. You can leave it as just a log, but where's the fun in that? We imagined an Empire Count who went over to Lustria and saw some of the great stegadons used by the lizard men. He found them scary enough so made his ram head to resemble one. Then the orcs stole it from him. So here we found two options in our junk box.
The red guy won so OFF WITH HIS HEAD!! Using clippers we separated him from his head.
Use a pin drill to add a hole in each piece, the head and dowel. We used a 1/2 inch dowel for our log. Place a pin (piece of a paperclip will work) into the head and once you have the right length, glue it into both parts.
Now you'll need to attach the fine battering ram to the carriage support. We recommend a thin hemp or cotton string as seen here. A simple loop over the log will get you started. You can use a slip knot and just cut off any tail remaining behind. Wrap it around your log a few times and then wrap up and over the top support. After going around the upper support, go back down and attach it to the log one more time.
Repeat the steps for the other end and you'll be looking good!
Now the canopy. We found theses sticks at a local craft store for 3.49. The are fairly uniform and few had any warping. We'll need 16-20 for our canopy.
Once measured it was determined that 8 sticks would fit perfectly. First tape them together and cutting a couple others for cross supports, apply the glue to them and press in place.
If you are cost conscious, you can use wooden coffee stirrers gathered from your local coffee spot. You'll need to keep trying for the straight ones as they tend to be prone to warping.
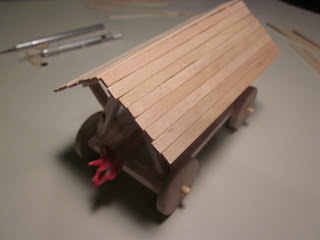
.Make two of the roof pieces and glue them onto your supports. You should have something resembling this.
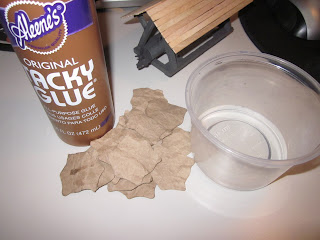
Now you probably don't want the castle defenders dropping hot oil or flaming arrows on your nice battering ram canopy so we'll need a defense. In medieval times they would cover the top with animal hides for protection. We drew a "cow" skin pattern and cut it out of a brown paper bag.
You'll need a good many, we used 19 or them. Once you have them cut out, crumple them into little balls like you see here.
Next get a small container, some PVA glue and all your skins. Pour a bit of water into the container and then add enough glue to create a milky consistency.
Place a few of the "cow" hides into the mixture and make sure they get soaked through.
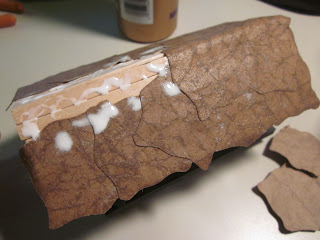
Pull them out one at a time and apply them to the canopy. Here's our first two. They will shrink slightly so leave enough overhang.
Keep layering the skins on. You can add some extra glue to be sure they stay put.
Here's what you'll have once completed.
While they are still damp add a few washes of various browns for some variety.
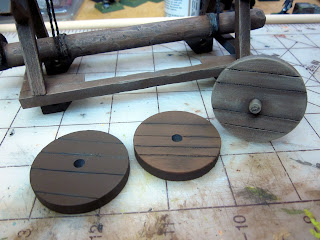
Now onto painting the carriage. We primed everything black, well dark gray. We added a wash of black into the wheel recesses.. Once it dries, add a dark brown like Burnt Umber.
Apply the same color to the rest of the battering ram carriage.
You'll then want a medium brown, we used nutmeg. And lastly a highlight color. We used Mushroom for our highlights. Here are all three stages.
Paint the rest of the ram and carriage the same way as the wheels. Use a dry-brush for the highlight color.
Next for the ram head itself, we used Wrought Iron after our base coat of black, it has a nice bluish hue. Then we dry-brushed the head with "Metallic Gunmetal" and highlighted with "Aluminium".
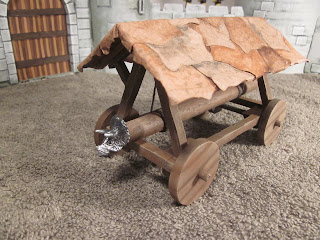
And there you have it. A Siege Battering Ram with Carriage and Canopy!
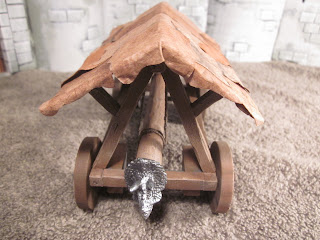
Here it is from the front side.
Now the Orcs and Goblins just recruit a giant and have him push it into place.
We hope you enjoyed this "How To" post. Please let us know how much with a comment or an email. We're planning an encampment for our siege so stay tuned for our next post in the series!
Have a great Battle!
The Old Crow



















nice work
ReplyDeletethanks i really found helpful nice work
ReplyDeleteYour Welcome Jake, Good luck with building yours!
DeleteHow did u attach the wheels?
ReplyDeleteThanks for asking!
DeleteWe used four small pieces of wood. They are attached at each corner of the frame and protrude out from the bottom of frame. We drilled a hole through each piece that was slightly larger than the axle and just below the frame. We glued the axle through the first wheel, slid the axle through the two pieces of wood and then glued it into the opposite wheel.
You can just glue the axle to the frame if you are not worried about it rolling.
This comment has been removed by the author.
Deletehow did you cut the wood
DeleteUsing an x-acto knife or similar hobby knife.
Deletehere's a like to one on Amazon http://a.co/eVjXRZp
Helped me finish my school project
ReplyDeleteAwesome!! Glad it helped! Would love to see some photos of your finished project!!
Deletewhere did you find the materials? I am having a hard time finding them
ReplyDeleteWe have Michaels stores in our area, but you can purchase online. Here are the disks http://www.michaels.com/wood-discs-1.5-inch/10049505.html
DeleteWalMart carries the Woodsies sticks: https://www.walmart.com/ip/Woodsies-Natural-Skinny-Craft-Sticks-5-75-75pk/35647199
could u upload a materials list i just wanna make sure i get everything(im a hour out from the closest big town)
ReplyDeleteHey Bob, I hope you found everything!
DeleteCould you make a parts list for this project? I want to use it for my engineering project, but the parts are jumbled throughout the instructions, making it hard to know what to get.
ReplyDeleteHope this helps,
Delete1 - 36" x 1/4" inch square hobby stick. You can easily use balsa wood too.
1 - 36" x 3/16" inch square hobby stick
1 - 36" x 1/8" x 1/4" rectangular hobby stick
4 - 1.5 inch wooden circles
1/8 inch dowel for axels
1/4 or 1/2" dowel for ram
String and Ram Head
Brown paper bag
1 paperclip
16-20 craft sticks for canopy or coffee stirrers
Can you send a link for every material you used?
ReplyDeleteHope this helps,
Delete1 - 36" x 1/4" inch square hobby stick. You can easily use balsa wood too.
1 - 36" x 3/16" inch square hobby stick
1 - 36" x 1/8" x 1/4" rectangular hobby stick
4 - 1.5 inch wooden circles
1/8 inch dowel for axels
1/4 or 1/2" dowel for ram
String and Ram Head
Brown paper bag
1 paperclip
16-20 craft sticks for canopy or coffee stirrers
This comment has been removed by the author.
ReplyDeleteThx for the tutorial.
ReplyDeleteWhat miniature is the one that pushes the siege engine?
Planning to build a 10mm Grond. I've built the ram (to scale 100 ft is very long!) So looking for ideas about the frame for hanging it and found this. Thanks
ReplyDeleteAlso, for the beasts to haul it, I found the same plastic ceratopsians you are using for the head, outstanding!