Monday, November 26, 2018

Reader Built Trebuchet, Siege Tower and Battering Ram!

At Battleground Hobbies we enjoy sharing our love of designing, building and collecting scale models for table top war games. Sometimes we even get great feedback. Among our top posts are "How to Build a Siege Tower" and "Battering Ram" We recently received a comment on one of these. 

A reader from Moscow left this: "Thank you. It's great! My son used your ideas for historical school project. Something was difficult and I helped him. He did this nice siege tower and trebuchet".

Reader Built Trebuchet, Siege Tower and Battering Ram
We thanked her and asked for some finished photos to share with everyone. We received this reply along with some photos: "I've sent you some photos of our siege engines. We also did a battering ram. There are plastic knights from my childhood on the photos. They were made in the mid 1970s."  

Here they are!!
Reader Built Trebuchet, Siege Tower and Battering Ram
Her son shows perseverance and determination!!

Reader Built Trebuchet, Siege Tower and Battering Ram
And he built a very nice trebuchet!!

Here's our post they refer too: "How To Build A Trebuchet"

Reader Built Trebuchet, Siege Tower and Battering Ram
and his Ram!! Keep modelling mate!!

Reader Built Trebuchet, Siege Tower and Battering Ram
If you have completed a project inspired by one of our posts, please share it with us!!

Have A Great Battle!!
The Old Crow

Monday, November 19, 2018

Sarissa Precision Town Villa for Gangs of Rome

Sarissa Precision Gangs of Rome Town Villa
A few months back we did a post on a simple Sarissa Precision kit and today we'll be looking at one a bit more complex, the Town Villa. When the three main sections are completed it will measure approximately 11.5 x 14.25 inches.

Sarissa Precision Gangs of Rome Town Villa
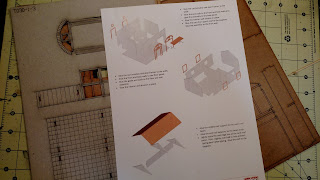
As mentioned in the previous Sarissa post, the instructions are plain straight forward illustrations which are easy to follow.

Sarissa Precision Gangs of Rome Town Villa
The kit consists of 11 MDF boards and 3 of heavy card stock for the roofs, doorways and windows.

Sarissa Precision Gangs of Rome Town Villa
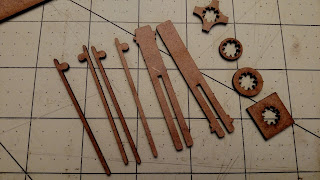
The front section is a simple affair with the four outer walls and two inner dividers. The colonnade out front is the most complex part of the kit. Each column consists of 10 pieces. The two main vertical pieces interlock, the small ring slides on the bottom fist, then the larger ring and finally the square base. The four smaller vertical pieces then tuck into the four inner corners and base. Lastly the cross like cornice goes on the top.

Sarissa Precision Gangs of Rome Town Villa
Once all the columns are assembled they line up under the support structure on the front of the villa like you see here.

Sarissa Precision Gangs of Rome Town Villa
The roof for the colonnade has an MDF base and five low triangles which have tabs that go into slots on the card-stock roof.

Sarissa Precision Gangs of Rome Town Villa
Once dry, the colonnade roof tucks onto the front of the building like so.
Sarissa Precision Gangs of Rome Town Villa
The rear of the first section has nine small window frames along the roof line, a rear doorway and small porch roof that will interlock with the middle section.


Sarissa Precision Gangs of Rome Town Villa
The sections main roof has a long vertical ridge beam and five trusses. We found it helpful to glue one side first, let it dry and then do the other side. We also glued some extra MDF pieces along side some of the trusses for additional support.

And when both sides of the roof are thoroughly dry it will sit very snugly on top.

Sarissa Precision Gangs of Rome Town Villa
Now the mid section! The first side starts very much like the front with four outer walls but with only one dividing interior wall. There is a courtyard piece on the base plate in the middle of this section. The inner courtyard porch roof sticks out into this area.

Sarissa Precision Gangs of Rome Town Villa
Then you get to do it all again for the opposing side.

Sarissa Precision Gangs of Rome Town Villa
Once you finish this section you'll have two buildings with a courtyard in between.

Sarissa Precision Gangs of Rome Town Villa
The rear of the front section  will face the courtyard......

Sarissa Precision Gangs of Rome Town Villa
... and tuck into it like so.

Sarissa Precision Gangs of Rome Town Villa
The final middle section step, besides the roofs, is to attach the porch support for the rear sections porch roof.

Sarissa Precision Gangs of Rome Town Villa
The third and final section has a simple first floor, very much like the front of the villa, and then you'll need to build the second floor which is just as simple.

Sarissa Precision Gangs of Rome Town Villa
Attach the rear porch roof like so.

Sarissa Precision Gangs of Rome Town Villa
Here is the courtyard side of the rear section with the second floor on top.

Sarissa Precision Gangs of Rome Town Villa
The upper and lower back of the section has several window frames to install.

Sarissa Precision Gangs of Rome Town Villa
The flat top roof was a slight pain to get glued all together at the same time but it is doable.

Sarissa Precision Gangs of Rome Town Villa
and there is the rear section.

Sarissa Precision Gangs of Rome Town Villa
Now put the Town Villa sections together and there you have it!! As we mentioned it measures approximately 11.5 x 14.25 inches and is quite a center piece for whatever tabletop game you have planned!

Sarissa Precision Gangs of Rome Town Villa
Here is the top view,.....

Sarissa Precision Gangs of Rome Town Villa
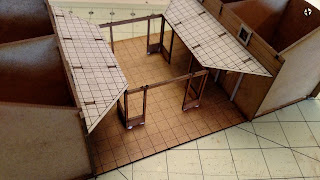
and with all the roofs removed you can see plenty of space for action inside!

Sarissa Precision Gangs of Rome Town Villa
With a few additional kits and some ingenuity you'll have an entire city block before you know it!

Have A Gret Battle!!
The Old Crow

Saturday, August 11, 2018

Early WW2 Polish Armor for Bolt Action

Early War Polish 7TP Tank
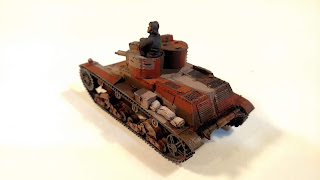
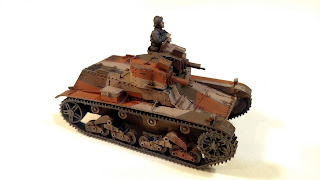
Here they are, the Polish 7TP JW and 7TP DW Twin-Turret tanks for our early war Polish Army!

Early War Polish 7TP Tank
The 7TP was the only genuine tank produced in Poland before World War II. The 7TP stood for 7 Ton Polish even though it was a 9 ton vehicle.

Early War Polish 7TP Tank
It was also the most combat worthy armored vehicle in the Polish Army at a time of the German invasion in 1939, and one of the icons of the pre-war Polish Army.

Early War Polish 7TP Tank
Several guns were considered but the Swedish 37mm Bofors gun was chosen, since it had been adopted as a standard towed anti-tank gun for the Polish Army, and offered good performance for that time.

Early War Polish 7TP Tank
The 7TP was the most advanced of all Vickers 6-Ton tank derivatives in the world, and can be considered a Polish design, being a compilation of foreign licences and their own inventions.

Early War Polish 7TP Tank
Despite all of this, it was not the most modern tank in 1939, but it kept pace with the world's standard for a light tank.

The light tank class constituted a mainstay of armored forces worldwide, and the 7TP could be a match for any enemy vehicle.
Early War Polish 7TP Tank
In March 1935, the first series of 22 twin-turret tanks was ordered.

Early War Polish 7TP Tank
All were utilizing machine gun turrets removed from 22 Vickers E tanks during their conversion to single-turret.

Early War Polish 7TP Tank
Such armament was a forced solution, since a final turret and gun had not yet been chosen for the single turret.

Early War Polish 7TP Tank
For additional information on the 7TP, check out The PIBWL military site.

Have A Great Battle!
The Old Crow

Sunday, August 5, 2018

Sarissa Gangs of Rome buildings and Accessories

Sarissa Gangs Of Rome
Well with our love of the 4Ground kits we put off Sarissa products until now. With the coming of Gangs of Rome from War Banner, Sarissa has developed a series of Roman buildings and Accessories for the game. Today we'll take a peek at this Semi Detached Small Mixed Shop.

Sarissa Gangs Of Rome
The simplicity of the kit is kind of nice. Two mdf boards and one heavy card stock are all you need!

Sarissa Gangs Of Rome
On the back of the cover are basic instructions on the assembly.

Sarissa Gangs Of Rome
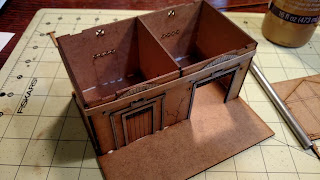
We took a couple minutes to glue on the door and window frames. Then we attached the four outer walls to the base, inserted the middle room divider and wrapped it with a rubber band to let dry.

Sarissa Gangs Of Rome
The upper floor was very much the same. Four window frames, outer walls and a dividing wall. There are no stairways or working doors like in the 4Gound kits.

Sarissa Gangs Of Rome
The roof is a heavy card stock with a simple mdf frame.

Sarissa Gangs Of Rome
A quick awning over the stall doorway and there you have it. I wish we would have timed it because it couldn't have been much longer than 30 minutes from start to finish and we have a grand little building.

Sarissa Gangs Of Rome
These kits are quick and painless for anyone who has built models in the past and a great starter kit for any new to the world of tabletop gaming! We'll show you other Sarissa kits as we begin to establish terrain for an Italian Bolt Action Campaign!

Have A Great Battle!
The Old Crow