Thursday, October 25, 2012

Vostroyan Steampunk Raygun Holster and Sword

We had an old cavalry cutlass hanging around and decided it needed an upgrade. It was plain metal with a black scabbard with plain metal accents. The whole thing was a bit tarnished so we masked off the grip and blade along with the black on the scabbard.

Using the Rustoleum brand Hammered Metal spray paint we coated the guard and scabbard accents.

To cover the black part of the scabbard we cut a piece of suede, wrapped it around the scabbard and hot glued it together. This was done in three pieces.

We added the same leather cording from the handle of the raygun to the grip of the sword.

The holster form was made from a thinner cardboard and once again we wrapped it in suede and hot glued it together.

For the front accent we kept a seam and cut several holes on either side. We intended to lace it with the leather cording but had a few issues so used a cloth strap instead.

Using a magnetic snap closure we cut off an old backpack, we created an attachment for the gun belt.

Once closed, the magnet is strong enough to hold the holster and gun in place.

This was an inexpensive project. Other than the hammered metal paint, the only thing we needed to buy was the suede. For a 1.99 we found a large suede skirt at a second hand shop and cut it up to use on these projects.

Now onto building the power claw! Stay tuned for future posts on that one!

Have a Great Battle,
The Old Crow

Monday, October 22, 2012

New Release - Warhammer40k The Horus Heresy Novel, Angel Exterminatus

Warhammer40k The Horus Heresy: Angel Exterminatus
The newest addition to the Warhammer 40k The Horus Heresy novel series, Angel Exterminatus is available for advanced order. This one will be hardback and is written by New York Times best selling author Graham McNeill. His other novels in the Horus Heresy series are Fulgrim and Mechanicum.

Warhammer40k The Horus Heresy: Angel Exterminatus
Warhammer 40k players should be anxious to gain valuable background details from the annals of the Iron Warriors and the Emporer's Children in this beautiful book. It's a great way to design themed scenarios for your 40k battles!

The complete cover artwork is shown across the front and back cover. Inside there are exclusive black and white illustrations by artist Karl Richardson.

Warhammer40k The Horus Heresy: Angel Exterminatus
What's in the book? Here's a brief synopsis: Perturabo - master of siegecraft, and the executioner of Olympia. Long has he lived in the shadow of his more favored Primarch brothers, frustrated by the mundane and ignominious duties which regularly fall to his Legion. When Fulgrim offers him the chance to lead an expedition in search of ancient and destructive xenos weaponry, the Iron Warriors and the Emperor's Children unite and venture deep into the heart of the great star maelstrom that haunts Perturabo's dreams. Pursued by vengeful survivors from Isstvan V and the revenants of a dead Eldar world, they must work quickly if they are to unleash the devastating power of the Angel Exterminatus!

In addition to the Horus Heresy series, Graham McNeill has written great novels based on the Ultramarines. The Second Omnibus contains the Killing Ground, Courage and Honour and The Chapter's Due.

Have a Great Battle
The Old Crow

Thursday, October 11, 2012

Boys and Men, War-games then and now


I stopped by a friends house to help with a project and discovered this fine set up on the coffee table. Everything was there. The fortifications, infantry, mobile artillery, armored vehicles and even air power. His grandson had been over the night before and was going at it.

Then I wondered if he'd wind up playing war-games like the rest of us do. Painstakingly building and painting soldiers for an army. What will he choose? Historical dark age vikings for SAGA, Winged Lancers for Pike & Shotte, British Paratroopers for Bolt Action? Maybe he'll traverse to fantasy games like Warhammer and Lord of The Rings or Sci-Fi games like Firestorm Armada or Warhammer 40k. Who knows.

I remember back to the days of cardboard box houses and if we hit it right, confiscating some O gauge train buildings from our dads stash. We'd set it all up and battle all night long. We used plastic army men, misc space figures, animals, Vikings and even some Cowboys and Indians.

Usually we set up a town and had the locals round up some mercenaries to help with their defense. Then the evil army would show up and try to take the place over. It was always a desperate struggle but the defenders would always rally and make the town safe once again.

It had me wondering. I went to the basement and rummaged through some boxes and came up with some of the very soldiers we played with as boys 30-35 years ago. And today we use more sophisticated rules and miniatures but in essence are still playing war-games

So what will the next generation come up with? We had a variety of things going on and the big one was no computer games. Unless Pong counts. It's a busy disconnected world and table top gaming is a great way to bring friends together and meet new ones for fun and socialization.

If Facebook and texts are the only ways you communicate, get out to a local hobby shop where some good old fashioned toy soldiers are on the table and have at it! Many shops have open nights and are more than willing to teach a new player. Old timers are always eager to share the love of the game with others.

Well if you know a new player, a memory of war-games from the old days or have a son carrying the torch, let us know. We'd love to hear about your story!

Have a Great Battle,
The Old Crow

Tuesday, October 9, 2012

New Polish Winged Lancers from Warlord Games


Here they come, thundering onto the battlefield, the Polish Winged Lancers from Warlord Games. Early this week the new box set was released from Warlord Games

There are few more exotic or dramatic bodies of men than were to be found in the squadrons, or pulks of the Polish Winged Hussars.

During the 16th and 17th centuries, these elite horsemen were the flower of Polish chivalry.They dominated almost all the dramatic battles of those centuries with their unstoppable charges.

Few could stand the dreadful impacts of their deadly long lances and those who did risked being hacked down with the variety of swords and pistols carried by the Hussars for close quarters fighting. The vision of the winged lancers with their wooden-framed, feathered wings was a stirring sight and with their colourful plumes, bright clothing and streaming pennants they would be a sight you wouldn't forget.

This brand new, excellent metal boxed set from Warlord contains:
• 8 metal cavalry models including standard bearer, officer and musician.
• 7 steel lances.
• 4-page background guide
• Full-colour standard and lance pennants.

In addition to the boxed set of Winged Lancers, Warlord has created a pack of 3 random Hussars so you can add more horsemen to your regiment.

Warhammer players will recognize the inspiring figures as a basis for Empire troops from the Kislevite plains.

You’ll find rules for using these awe-inspiring historic cavalrymen in Warlords Pike & Shotte rule book.

Have a Great Battle,
The Old Crow

Monday, October 8, 2012

How to Build a Steampunk Vostroyan Raygun

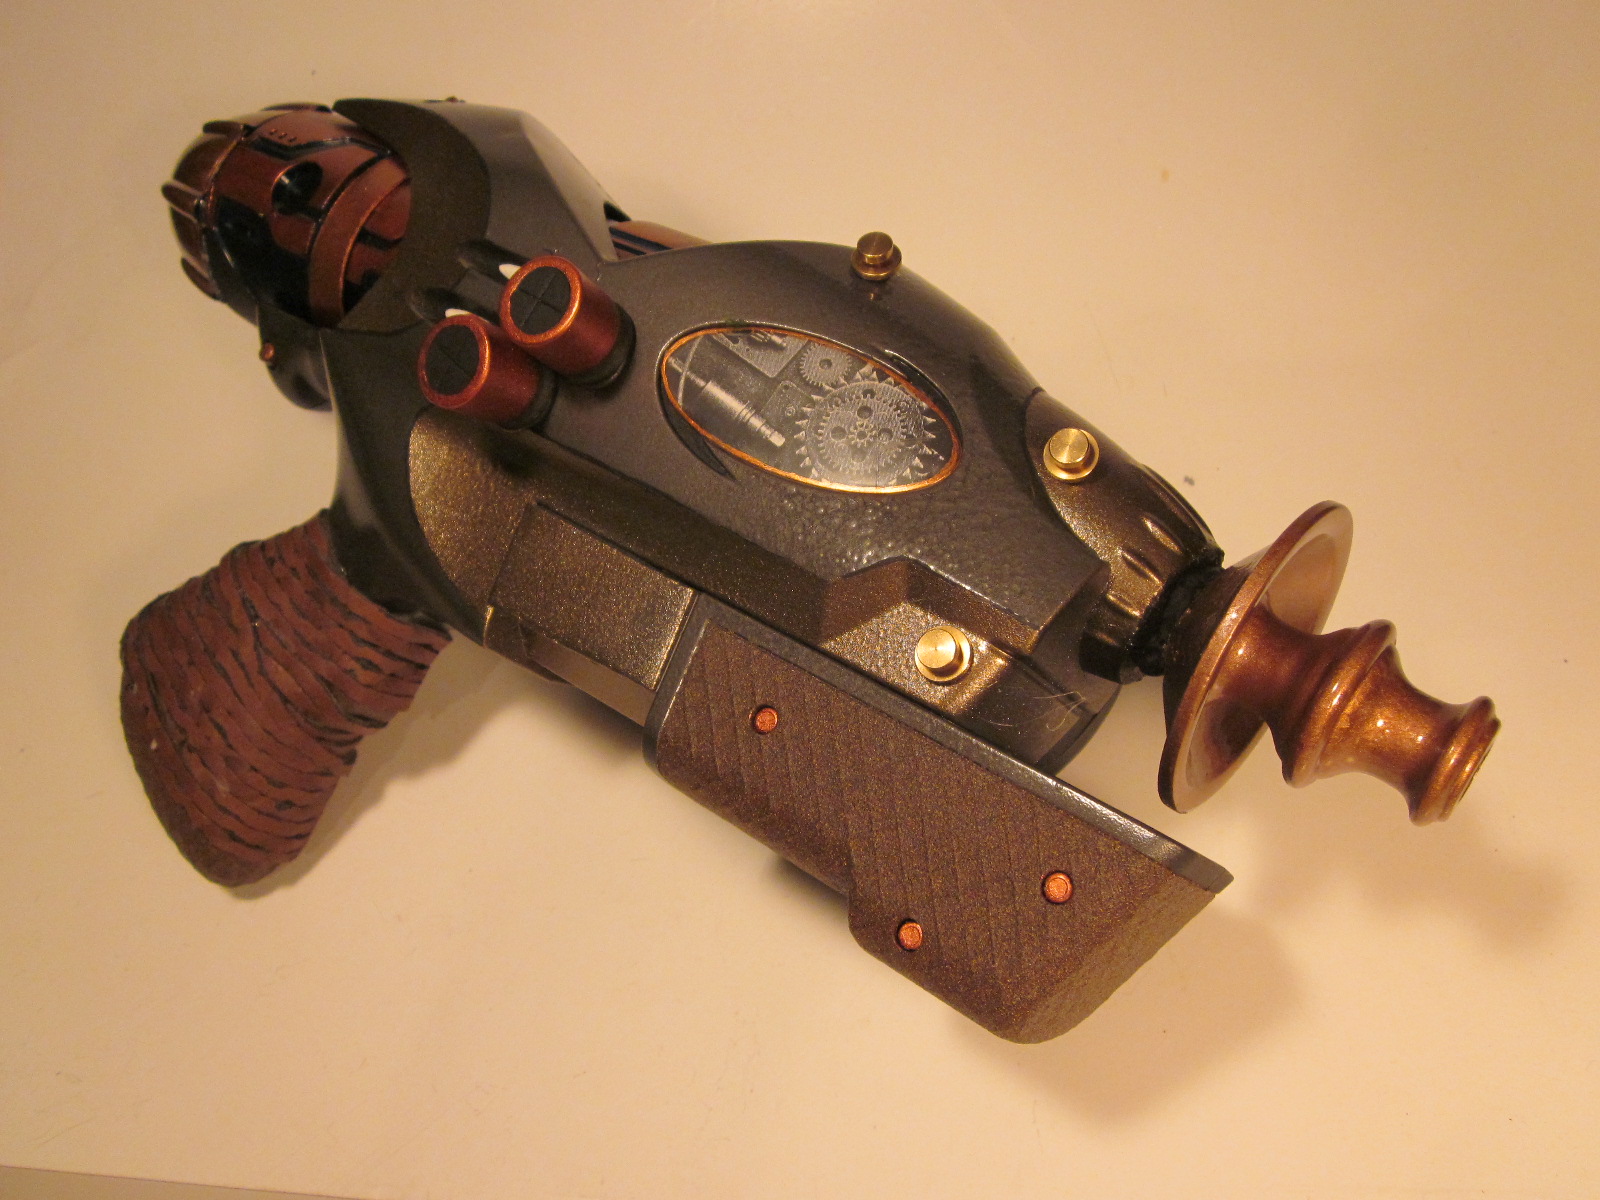
OK, we put together a pair of Steampunk goggles last time we blogged, so today we'll show you how to build a Steampunk Raygun. This is the finished product. Lot's of copper, brass and bronze is the key. Oh, and gears if you got'em.

Now, how to build it. We started with a great old water pistol some brass candlesticks, capacitors, brass bits, foam and pieces from an old braided leather belt. This particular squirt-gun used a pump action and we liked the look of the pump forward rather than back

We started by placing foam spacers in the blank area where the retracted pump would be. This should hold in place and cover the holes and slot from the extended pump.

Next we cut the brass candlestick, drilled a hole large enough for the "stick" and slid it in place. Using a hot glue gun will hold most of your pieces together. We also would recommend finding candlesticks that unscrew instead of needing a hacksaw to cut the one we found.

We used another part from a different candlestick for the front of the raygun and glued the capacitors to the right side.

Rustoleum makes some very nice paints in metallic, textured and also a hammered finish. You'll see how it adds a nice touch to the finished look of the gun.

Here is the base painted in the Rustoleum Hammered Metal and the ray painted with the Brass Hammered Metal.

Next we masked off different inserts on the gun and sprayed with a metallic bronze.

Masking off the handle and the insert on the pump they were sprayed with a textured brown to simulate our wood handles. You can go hog wild and add the wood grain with a brush but we have other plans.

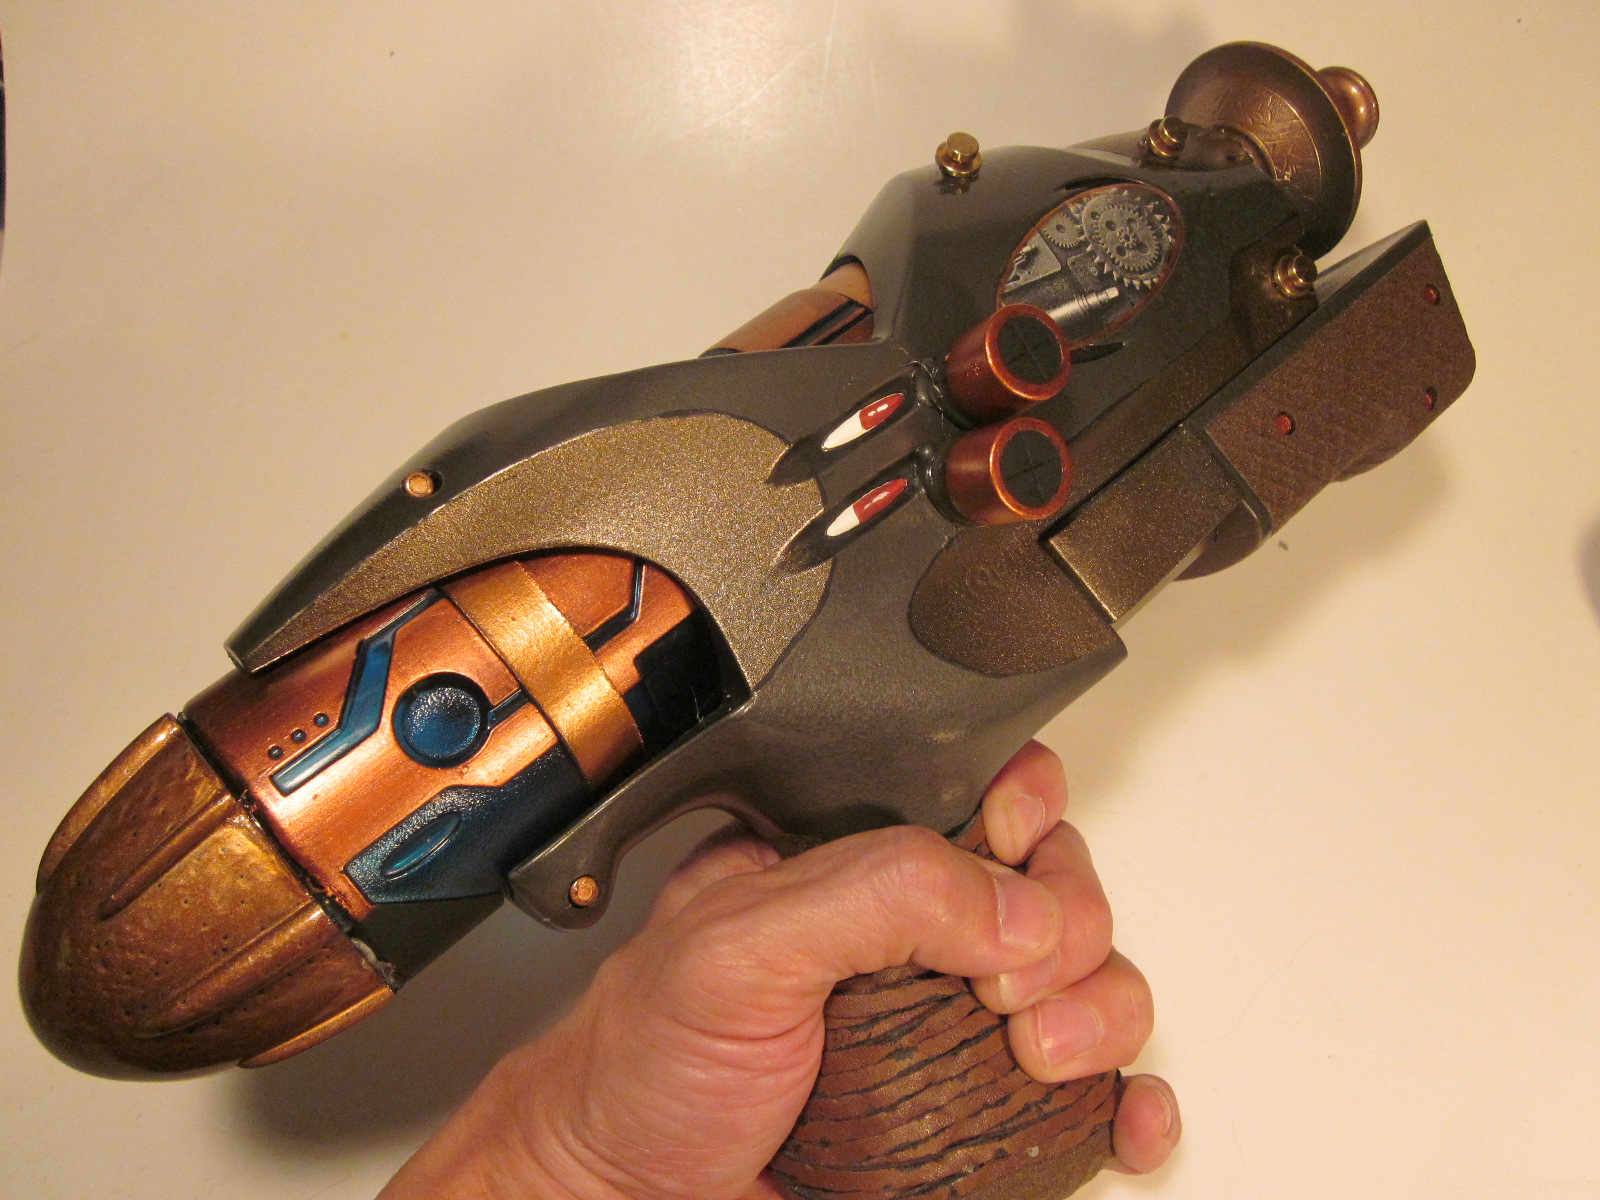
This is the water supply for this particular squirt gun. We'll be using it once we make a few modifications.

You can use actual copper strap to wrap around anything you want to "Steampunk" but to keep the cost down we cut two straps out of cardstock.

We wrapped them around the tank and painted them with a bronze acrylic. Adding various spots in copper completed the "power Supply" for our raygun. The final touches will be added once it is in place.

Here the power supply is in place and we painted two of the embossed areas to simulate gauge readings

Small capacitors were placed in the recessed areas from the screw holes in the pump and painted copper. Brass bits were added into the upper holes.

The leather straps were wrapped around the handle to form a nice grip.

For our final touch we printed a picture of gears and placed it under the clear plastic insert on both sides of the gun and painted around the edge to create a bronze ring.

There you have it. Your very own Steampunk ray-gun ready for action.

So grab your goggles for eye protection from the high intensity beams of your raygun! Any Vostroyan would be proud to wield such a fine weapon.

Have a Great Battle!
The Old Crow

Saturday, October 6, 2012

How to Build Steampunk Goggles


OK a bit of a divergence but today we thought we'd show you how to build a pair of steampunk goggles. If you like to build terrain and other things, this isn't that far off topic. Many of the same principles work here too.

Here's the finished piece perched on an old Soviet era fur Ushanka Hat. Very reminiscent of a Warhammer 40k Vostroyan Guard outfit.

We started with a pair of inexpensive welding goggles. We removed the leather nose piece for painting.

We also removed the strap, lenses and lens rings. These are a hard plastic so we tried a brand of spray paint designed for plastics. It did a decent job but we found it pulls off with taping and also scratches on any medium hit/drop.

While it dried, we used Rustoleum Hammered spray paint on the lens rings for a great texture. Using old computer capacitors we sprayed them with a metallic bronze. A plastic gear from something we disassembled was painted the same as the lens rings.

Using a sturdy adhesive we glued the gear and capacitors on either side of the goggles.

We drybrushed the side vents with copper and added patches of flat black and dark gray for weathering.

A bit of black wash was used in some of the cracks and crevices to finish it off.

And there you have it. Another fun weekend project for those of you who need a change of pace!

Stay tuned for our next post as we finish a Steampunk Raygun!

Til then, Have a Great Battle,
The Old Crow