Over the holidays and into the new year we discovered Dragon Rampant, the wonderfully simple fantasy war game from Osprey Publishing!
After the last few years of Bolt Action it was grand breaking out the old fantasy figures and putting them into action. The beauty of the game, created by Daniel Mersey, is the fact you can use virtually any fantasy figure you have or like! His previous game Lion Rampant is the historical equivalent of the same game. The Command and Control aspect is where the game differs from others.
It's not as simple as you move, enemy moves, you move, etc.. You begin by giving a command to one unit and if it passes, then you go to another unit and test. If it passes your turn continues, but the first time you miss a command test, then your turn is over. You can have a turn where you move every unit in your army just as easily as failing your first test and ending your turn that fast.
Armies are made up of an average of 5-8 units with anywhere from 1-12 figures. A basic infantry unit has 12 figures and a basic cavalry unit has 6.
Here we have a 24 point army with 12 Heavy Foot, 6 Heavy Riders, Heavy Missiles, 12 Belicos Foot and the army general is an Elite Rider with the Flying Special Rule
If you like Orcs and Goblins, they are just as easy to build a 24 pt army. The spider riders are Light Riders, the wolf riders act as Heavy Riders, The general is a single model that stands as a unit of Elite Riders so he will have the same number of wounds as a six model count unit. On the right is a 12 orc unit of Belicose Foot which act like beserkers with high offence and low defense. And a six model count Heavy Foot unit. Heavy Foot normally have 12 models so can take 12 wounds. Each wound removes one model. With a reduced model count unit of 6, each model can take 2 wounds before being removed.
Here a heavy hitting Lizardman army, also 24 points, has a Greater War Beast, two units of Belicose Foot, and a reduced model count Heavy Foot unit consisting of only 3 models. Because it is still a 12 wound unit, each model can take 4 wounds before being removed. The general is acting as a unit of Elite Foot
The army builds are evenly balanced so every army has an even chance. The rule book gives you an Overview, Understanding the basics,
Playing the game section, How to build your Army list, basic Strategies and tactics, Sample armies, 6 easy Scenarios and lastly a Campaigns section.
Yes that is an undead T-Rex.
Here the orc Belicose Foot charge into a Greater Warbeast as the Heavy Foot move in for the kill.
You can build an army using any figures YOU like!! So go wild with it and try out as many options as you like. The one army here has A Greater War Beast with the fly rule, 2 giants are Lesser War Beasts and the Chariots are Heavy Riders with the chariot special rule!
So break out those fantasy figures and Have A Great Battle!!
The Old Crow
Showing posts with label Dogs of War. Show all posts
Tuesday, March 3, 2020
Tuesday, November 11, 2014
Wargames Table Restoration and Refinishing
Found a fantastic old worn out table that had been used for a work bench and was heading for the scrap yard. I suddenly had grand visions of a gaming table with drawers large enough to hold the armies needed to go on it. So I set upon it with a vengeance! Here is the result, now the process...
At 3' x 5' it is a perfect size for wargames of all varieties. So off came the legs. There was a ton of wear on the whole surface. Sorry no photos of the whole thing before we started.
The drawer facings had also been abused.
Inside wasn't much better. The legs are on the right already being sanded down.
Here's a drawer facing sanded and the other one in the mix.
Wanting to make it a little distinct, it was decided to go with a cherry finish on the legs and frame then accent the top and drawers with a red mahogany.
We carefully removed and then replaced the tag from one of the legs. Originally thought it was brass or bronze but discovered it to be a leather tag. Need to research the origin.
And yes, the foam trays with wargame armies fits perfectly with plenty of extra room for books and dice. Theses SAGA Viking Hirdmen and Warhammer Dogs of War figures will have a nice new home!
A coat of satin polyurethane was added to the top and drawers where the action will occur. We'll have to post the inaugural game once time permits. Now to build a room to go with the table.
Have a Great Battle
The Old Crow
At 3' x 5' it is a perfect size for wargames of all varieties. So off came the legs. There was a ton of wear on the whole surface. Sorry no photos of the whole thing before we started.
The drawer facings had also been abused.
Inside wasn't much better. The legs are on the right already being sanded down.
Here's a drawer facing sanded and the other one in the mix.
Wanting to make it a little distinct, it was decided to go with a cherry finish on the legs and frame then accent the top and drawers with a red mahogany.
We carefully removed and then replaced the tag from one of the legs. Originally thought it was brass or bronze but discovered it to be a leather tag. Need to research the origin.
And yes, the foam trays with wargame armies fits perfectly with plenty of extra room for books and dice. Theses SAGA Viking Hirdmen and Warhammer Dogs of War figures will have a nice new home!
A coat of satin polyurethane was added to the top and drawers where the action will occur. We'll have to post the inaugural game once time permits. Now to build a room to go with the table.
Have a Great Battle
The Old Crow
Friday, May 30, 2014
Warhammer Fantasy Dogs of War - Lumpin Croop
Today we throw the unmistakable halfling troop of Lumpin Croop and his Fighting Cocks at you. A few years back we talked about The Dogs of War for Warhammer Fantasy. They were my army of choice when you could field the entire lot and not just a regiment here or there. We shared a couple Regiments of Renown, Beorg Bearstruck and the Bearmen of Urslo and Voland's Venators! We even showed you how to build your own Ruglud's Armoured Orcs
The figures themselves are what caught my attention in years gone by. The many details are wonderfully added to these half-pint heroes.
Starting with Lumpin himself, he's just overflowing with extras like the loaf of bread, bottle of wine and his cook pot helmet.
The best part is his Dart Board Shield taken from the "Old Pig and Bucket" inn where the Fighting Cocks got their start.
The company standard bearer is Ned Hamfist who proudly carries the weather vane from the same establishment. Lumpin and his halflings use the vane as their rally point along with their battle cry “Hurray! Hurray! The Moot! The Moot!”
This stems from an occasion in a particularly nasty battle when Lumpin Croop attempted to give his troops new orders. What he actually shouted was, “Run away! Run away… to the Moot… to the Moot!” but his words were lost upon the wind and his lads charged ferociously upon the enemy, screaming their now instantly recognizable battle-cry.
Every figure is replete with a bevy of miscellaneous items to gaze upon. The halflings are stuffed with sacks and satchels. They even carry their cookware and mugs.
Extra bundles of arrows, firewood, backpacks bottles and trusty pipes stuck in the brim of a few hats can all be found.
The story of Lumpin goes something like this: Young Lumpin was forced to work long hours in the family forge. His grandfather set him to arduous and demeaning tasks such as poking the fire and straightening horseshoes. Not surprisingly Lumpin ran away from home as soon as he could. By this time he had already fallen into a life of pick-pocketing and bunk-artistry. These were talents doubtlessly inherited from his father along with his passion for root vegetables.
Lumpin Croop became a poacher. His extraordinarily acute night vision proved a great advantage on dark, moonless evenings. Lumpin soon learned to support himself from the surrounding farms and estates. This was an annoyance to the many gamekeepers who found their game stocks and reputations plummeting fast.
One day Lumpin happened to visit the Old Pig and Bucket, a shady hostelry in the otherwise attractive village of Beggar’s End. The inn’s landlord, Raggo Barrelgut, had been an eager buyer of poached rabbit in the past. On this occasion, however, rabbit pie was noticeably absent from the menu. Instead, the snug was brimming with angry gamekeepers led by the notoriously crazed Ned Hamfist. The gamekeepers were all armed with cudgels. Raggo was hiding in a corner looking embarrassed and a bit frightened.
Anticipating a sound beating, Lumpin immediately launched into a long and complicated story. Once he had begun he soon found himself spinning a yarn of excitement, treasure and vast banquets waiting to be had in the lands over the mountains. The gamekeepers were taken aback by the young poacher’s tirade and soon put all thoughts of vengeance aside. Eagerly they found themselves signing up to join Lumpin in his bright and exciting quest to the land of Tilea. Ned Hamfist bought drinks to toast their bold venture and some bright spark came up with a name for their band – Lumpin Croop’s Fighting Cocks.
From that day to this, Lumpin has tried very hard to give the Fighting cocks the slip. However, the gamekeepers are even better trackers than Lumpin and always manage to find him and insist that he takes them along on his adventure. Lumpin’s regular attempts to escape are thought to be ‘training exercises’ by his admirers. Similarly, his efforts to misdirect the Fighting Cocks away from Tilea and any chance of fighting are considered to be ‘initiative tests’. Unfortunately for Lumpin, the Fighting Cocks are extraordinarily good at direction finding, being experts at navigating their way around quietly in the dark. Their faith in Lumpin and their belief in his adventure is unshaken.
The truth is that Lukpin and the Fighting Cocks are really rather good. All the ‘training exercises’ and ‘initiative test’ have honed their natural skills to a point where they are expert trackers and woodsmen. Their marksmanship is, as you would expect, second to none. Their woodsman’s clothing and pelt-caps adorned with feathers are memorable to say the least.
Thanks to several remarkable battles, they have acquired a well-deserved reputation, and their services are now in great demand. On one occasion Lumpin was credited with saving an entire army. An enemy force had worked its way behind the army’s lines and was preparing to launch a devastating attack. At the same moment Lumpin happened to be leading the Fighting Cocks directly away from the sound of fighting. Unknown to him, his route was taking the Halflings straight towards the encircling enemy. In the ensuing clash the Fighting Cocks fought with great enthusiasm and the enemy was soon scattered. Everyone was very impressed by Lumpins foresight, not the least Lumpin himself, and his merry men were showered with offers of employment.
Indeed, money has started to flow into the band’s coffers, and Lumpin’s impromptu tale of fame and riches is starting to come true. His troops believe in him utterly and take great pride in their leader’s growing reputation. Lumpin himself is learning to live with his sudden change of fortune. He is becoming unexpectedly fond of the Fighting Cocks. Such is his dedication that even on the eve of battle he can be found in his tent working hard on devising new ‘training exercises’.
So, Have a Great Battle!
The Old Crow
The figures themselves are what caught my attention in years gone by. The many details are wonderfully added to these half-pint heroes.
Starting with Lumpin himself, he's just overflowing with extras like the loaf of bread, bottle of wine and his cook pot helmet.
The best part is his Dart Board Shield taken from the "Old Pig and Bucket" inn where the Fighting Cocks got their start.
The company standard bearer is Ned Hamfist who proudly carries the weather vane from the same establishment. Lumpin and his halflings use the vane as their rally point along with their battle cry “Hurray! Hurray! The Moot! The Moot!”
Every figure is replete with a bevy of miscellaneous items to gaze upon. The halflings are stuffed with sacks and satchels. They even carry their cookware and mugs.
Extra bundles of arrows, firewood, backpacks bottles and trusty pipes stuck in the brim of a few hats can all be found.
| The Fighting Cocks defend a hamlet |
Lumpin Croop became a poacher. His extraordinarily acute night vision proved a great advantage on dark, moonless evenings. Lumpin soon learned to support himself from the surrounding farms and estates. This was an annoyance to the many gamekeepers who found their game stocks and reputations plummeting fast.
| Early morning defense of a castle |
Anticipating a sound beating, Lumpin immediately launched into a long and complicated story. Once he had begun he soon found himself spinning a yarn of excitement, treasure and vast banquets waiting to be had in the lands over the mountains. The gamekeepers were taken aback by the young poacher’s tirade and soon put all thoughts of vengeance aside. Eagerly they found themselves signing up to join Lumpin in his bright and exciting quest to the land of Tilea. Ned Hamfist bought drinks to toast their bold venture and some bright spark came up with a name for their band – Lumpin Croop’s Fighting Cocks.
The truth is that Lukpin and the Fighting Cocks are really rather good. All the ‘training exercises’ and ‘initiative test’ have honed their natural skills to a point where they are expert trackers and woodsmen. Their marksmanship is, as you would expect, second to none. Their woodsman’s clothing and pelt-caps adorned with feathers are memorable to say the least.
| Lumpin Croop leading his men on to fame and riches! |
So, Have a Great Battle!
The Old Crow
Friday, November 22, 2013
Old Glory Dwarf Canon for Warhammer Fantasy Dogs of War
Old Glory miniatures have been around for a good while and if you're looking for a deal they might fit the bill. Old Glory is also one of the few scale model makers located here in the states. In the old days Warhammer supported Dogs of War armies and many Regiments of Renown. One of these was a light caliber mobile canon called Bronzio's Galloper Guns. They were excellent models but are out of print and may be expensive to find on eBay or other venue.
However if you have a friendly gaming club that allows you to play old school, Old Glory makes a dwarf horse canon that fits the bill. This model is a smaller canon than most dwarven artillery and comes with the horse and a crew of four. We left the horse out of our photo, sorry. We also swapped out the smaller metal wheels for larger plastic spares we had available.
Here we started basing the cannon with black and used Burnt Umber on all the woodwork. The dragon heads were painted with a base of Burgundy.
A lighter coat of Raw Umber was then applied to all the woodwork.
Last step for the wood was a light drybrush of Territorial Beige. The metalwork was given a coat of Antique Bronze and drybrush highlights of Pure Bonze.
The steel shod wheels were painted first with Gun Metal and then highlighted with Aluminium.
The canon barrel was painted with Pure Bronze.
We then applied a black wash to bring out details and last touches of highlights to the woodwork and metals.
The crew consists of a pirate captain and three stout dwarf warriors. Here they are with base coats and most details applied.
Finally based and in their "Old Glory". Maybe next time we'll show you how to build an artillery emplacement for any of your cannons.
Have a Great Battle!
The Old Crow
However if you have a friendly gaming club that allows you to play old school, Old Glory makes a dwarf horse canon that fits the bill. This model is a smaller canon than most dwarven artillery and comes with the horse and a crew of four. We left the horse out of our photo, sorry. We also swapped out the smaller metal wheels for larger plastic spares we had available.
Here we started basing the cannon with black and used Burnt Umber on all the woodwork. The dragon heads were painted with a base of Burgundy.
A lighter coat of Raw Umber was then applied to all the woodwork.
Last step for the wood was a light drybrush of Territorial Beige. The metalwork was given a coat of Antique Bronze and drybrush highlights of Pure Bonze.
The steel shod wheels were painted first with Gun Metal and then highlighted with Aluminium.
We then applied a black wash to bring out details and last touches of highlights to the woodwork and metals.
The crew consists of a pirate captain and three stout dwarf warriors. Here they are with base coats and most details applied.
Finally based and in their "Old Glory". Maybe next time we'll show you how to build an artillery emplacement for any of your cannons.
Have a Great Battle!
The Old Crow
Sunday, April 28, 2013
Ruglud's Armoured Orcs Dogs of War Unit Completed!
Last summer we did a post on How to Build Ruglud's Armored Orcs and never showed the finished models. Well today we rectify that error. Here they are in all their orcyness. The entire unit works well together and all have collected their mementos from past battles.
We'll review the individual models in the order we showed you in the previous post.
Here are the first two of Ruglud's boyz, both have items raided from the lizardmen across the pond in Lustria.
Next the veteran from the Dwarf Wars sports a miners pick.
This orc boy has some chaos warrior armor and sword.
Sporting a dwarf shield as a breast plate.
More dwarf mementos
These guys have some chaos and Empire memorabilia...
... and additional items from Lustria
And lastly as I mentioned, my favorite raided a Tomb King treasure trove and brought the kings head back to prove it.
Kings shield carried on his back too.
So there you have them all individually and together!
Have a Great Battle,
The Old Crow
We'll review the individual models in the order we showed you in the previous post.
Here are the first two of Ruglud's boyz, both have items raided from the lizardmen across the pond in Lustria.
Next the veteran from the Dwarf Wars sports a miners pick.
This orc boy has some chaos warrior armor and sword.
Sporting a dwarf shield as a breast plate.
More dwarf mementos
These guys have some chaos and Empire memorabilia...
... and additional items from Lustria
And lastly as I mentioned, my favorite raided a Tomb King treasure trove and brought the kings head back to prove it.
Kings shield carried on his back too.
So there you have them all individually and together!
Have a Great Battle,
The Old Crow
Sunday, March 17, 2013
How To Build Tents for a Historical or Warhammer Siege Encampment
Today we'll show you How to build tents for your besiegers encampment. You can't have soldiers and supplies standing about in the rain, so lets make them somewhere to stow their gear and have a respite.
To start you'll need a base, we used some 12 inch foam to carve our hill. You'll also need a piece of fabric, something natural looking, three round toothpicks and a stick you can cut down. We cut a 3" and two 1.25" segments.
Next we carved the hill into a rough shape that would hold a tent 3 inches long.
We then notched a point at the ends of our short sticks for the uprights.
After sanding the roughness off the hill, we measured the length of our support and placed the uprights into the foam. Once positioned we removed them, filled the hole with some glue and stuck them back in. Before it dried we glued the crossbar in place and pressed it together.
We added some areas of glue and attached small rocks and a mix of sand and medium ballast.
After it was set we painted the entire surface dark brown with sand in the paint for extra texture.
When it dries, you can dry-brush on some layers of lighter browns and greens if you want a grassy knoll.
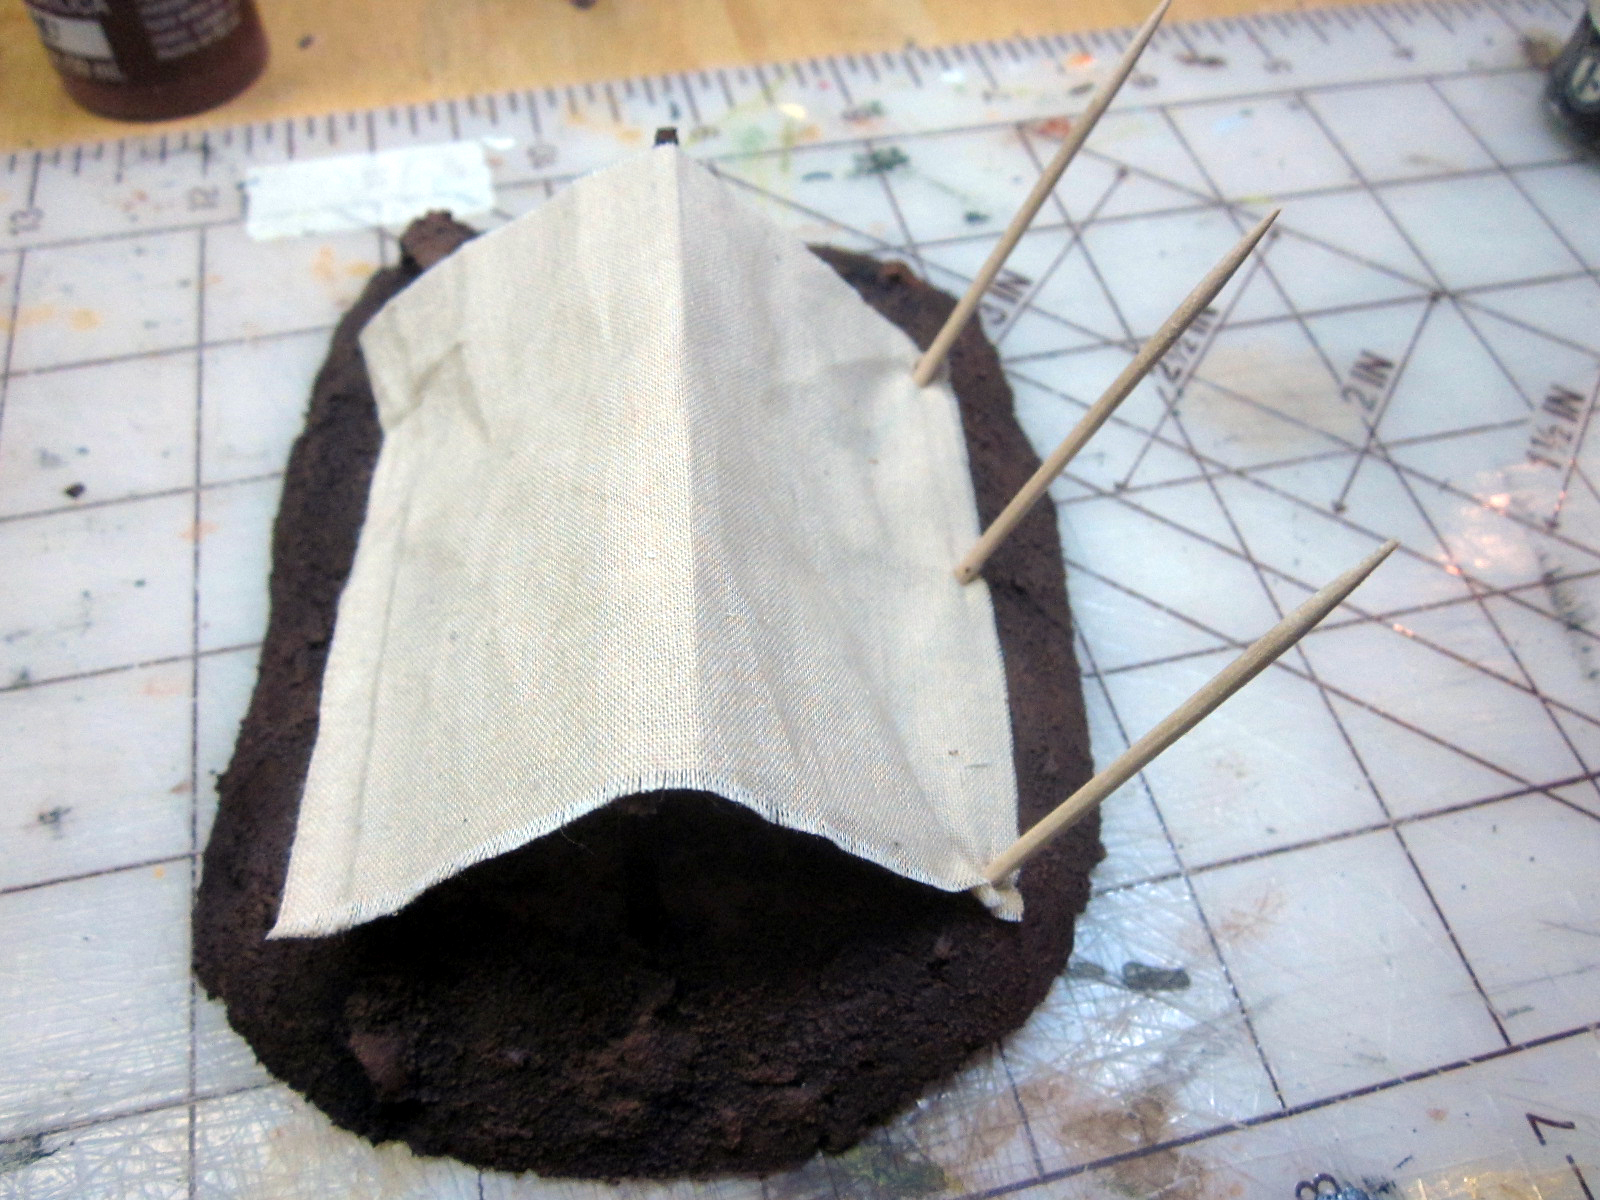
Next make sure your material is the same length as your support, ours is 3", and trim the cloth to roughly a square. Fold it in half and crease it if you can. This will lie across the support.
Take your round toothpicks and insert them into one of the sides at the corners and then the center.
Clip off the extra length, leaving tent pegs behind.
Using the pieces clipped off, repeat these steps on the other side. Be sure to keep the material tight.
We added a few tufts of static grass for texture. and filled the supply tent with crates, barrels and sacks.
And that's how to build tents for your besiegers.
This one wound up being a siege supply tent.
Add more tents to a larger base for making bigger terrain pieces with additional scenery bits like trees and shrubs. We even have stumps from felled trees in this piece plus a campfire. The trebuchet is set up beside the camp for easier access to fire.
We'll leave you with a few additional photos and wish you a great battle!
The Old Crow

To start you'll need a base, we used some 12 inch foam to carve our hill. You'll also need a piece of fabric, something natural looking, three round toothpicks and a stick you can cut down. We cut a 3" and two 1.25" segments.
Next we carved the hill into a rough shape that would hold a tent 3 inches long.
We then notched a point at the ends of our short sticks for the uprights.
After sanding the roughness off the hill, we measured the length of our support and placed the uprights into the foam. Once positioned we removed them, filled the hole with some glue and stuck them back in. Before it dried we glued the crossbar in place and pressed it together.
We added some areas of glue and attached small rocks and a mix of sand and medium ballast.
After it was set we painted the entire surface dark brown with sand in the paint for extra texture.
When it dries, you can dry-brush on some layers of lighter browns and greens if you want a grassy knoll.
Next make sure your material is the same length as your support, ours is 3", and trim the cloth to roughly a square. Fold it in half and crease it if you can. This will lie across the support.
Take your round toothpicks and insert them into one of the sides at the corners and then the center.
Clip off the extra length, leaving tent pegs behind.
Using the pieces clipped off, repeat these steps on the other side. Be sure to keep the material tight.
We added a few tufts of static grass for texture. and filled the supply tent with crates, barrels and sacks.
And that's how to build tents for your besiegers.
This one wound up being a siege supply tent.
Add more tents to a larger base for making bigger terrain pieces with additional scenery bits like trees and shrubs. We even have stumps from felled trees in this piece plus a campfire. The trebuchet is set up beside the camp for easier access to fire.
We'll leave you with a few additional photos and wish you a great battle!
The Old Crow
Subscribe to:
Posts (Atom)