A few months back we did a post on a
simple Sarissa Precision kit and today we'll be looking at one a bit more complex, the Town Villa. When the three main sections are completed it will measure approximately 11.5 x 14.25 inches.
As mentioned in the previous Sarissa post, the instructions are plain straight forward illustrations which are easy to follow.
The kit consists of 11 MDF boards and 3 of heavy card stock for the roofs, doorways and windows.
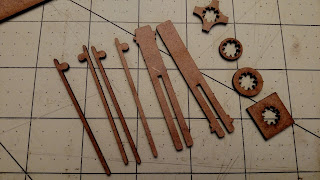
The front section is a simple affair with the four outer walls and two inner dividers. The colonnade out front is the most complex part of the kit. Each column consists of 10 pieces. The two main vertical pieces interlock, the small ring slides on the bottom fist, then the larger ring and finally the square base. The four smaller vertical pieces then tuck into the four inner corners and base. Lastly the cross like cornice goes on the top.
Once all the columns are assembled they line up under the support structure on the front of the villa like you see here.
The roof for the colonnade has an MDF base and five low triangles which have tabs that go into slots on the card-stock roof.
Once dry, the colonnade roof tucks onto the front of the building like so.
The rear of the first section has nine small window frames along the roof line, a rear doorway and small porch roof that will interlock with the middle section.
The sections main roof has a long vertical ridge beam and five trusses. We found it helpful to glue one side first, let it dry and then do the other side. We also glued some extra MDF pieces along side some of the trusses for additional support.
And when both sides of the roof are thoroughly dry it will sit very snugly on top.
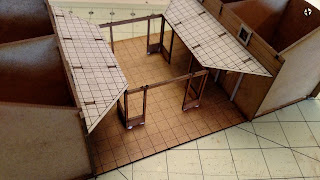
Now the mid section! The first side starts very much like the front with four outer walls but with only one dividing interior wall. There is a courtyard piece on the base plate in the middle of this section. The inner courtyard porch roof sticks out into this area.
Then you get to do it all again for the opposing side.
Once you finish this section you'll have two buildings with a courtyard in between.
The rear of the front section will face the courtyard......
... and tuck into it like so.
The final middle section step, besides the roofs, is to attach the porch support for the rear sections porch roof.
The third and final section has a simple first floor, very much like the front of the villa, and then you'll need to build the second floor which is just as simple.
Attach the rear porch roof like so.
Here is the courtyard side of the rear section with the second floor on top.
The upper and lower back of the section has several window frames to install.
The flat top roof was a slight pain to get glued all together at the same time but it is doable.
and there is the rear section.
Now put the Town Villa sections together and there you have it!! As we mentioned it measures approximately 11.5 x 14.25 inches and is quite a center piece for whatever tabletop game you have planned!
Here is the top view,.....
and with all the roofs removed you can see plenty of space for action inside!
With a few additional kits and some ingenuity you'll have an entire city block before you know it!
Have A Gret Battle!!
The Old Crow
 At Battleground Hobbies we enjoy sharing our love of designing, building and collecting scale models for table top war games. Sometimes we even get great feedback. Among our top posts are "How to Build a Siege Tower" and "Battering Ram" We recently received a comment on one of these.


