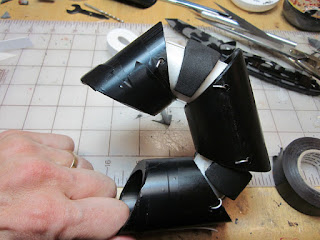
We started with a thin walled 1 1/2" PVC pipe for the "finger" joints.
They will fit in between the 2" black PVC pipe. They are cut with an approximate 60 degree angle.
the next steps are to drill holes through the joints..
And then the fingers.
They go together like so. Make sure the smaller part of the joint is on the TOP, opposite the smaller portion of the larger finger piece. The joint pieces pictured here are backwards and will need rolled over before securing them. Sorry we didn't get an image of them the correct way.
Then cut pieces of a heavy gauge wire to connect the pieces and thin foam rectangles for the back of the joints.
The foam can be bought in 9" x 12" (22.8 cm x 30.4 cm)at a local craft store.
Feed the heavy gauge wire through both pieces and bend the ends down to secure them.
Here is the "Finger" and joints connected.
Also acquire some elastic from your local craft or fabric store. Place a short amount on top of the first finger and secure it with hot glue. We then wrapped ours with electrical tape for extra security.
Feed it through the backs of the fingers and over the joint pieces. Pull it tight so the finger stays straight on its own and secure it to the back finger piece.
Take the thin foam strips we cut earlier and wrap it over the back of the knuckle joint. This will help keep the finger straight.
We carefully hot glued it at the ends taking care not to get it on the elastic.
Using fishing string, feed it into the bottom of the finger pieces and under the joints like so.
Tie it off on the bottom of the finger tip. We once again secured it with electrical tape too.
Now when you pull on the string, the entire finger should bend like so.
Now to affix them to the base. We used a 2" PVC trap and elbow joint to create our base.
We cut an opening in the top of the trap and inserted the elbow joint. It needed some trimming too but in the end it went together like you see here. Remember to pull the string through before you attach the fingers to the base. We had some PVC cement left over from a plumbing project and used it to fasten the fingers in.
We then cut a hole into the bottom of a small heavy plastic container, screwed the PVC trap into the bottom, cut a hole in the lid and fastened the lid on. All the while, passing the string through each hole.
Using a 1 gallon plastic bucket from drywall patch, we cut a curve out of the upper portion. This will be the underside of the hand, where the "thumb" will be. Once again, a hole was cut into the bottom and the finger strings passed through.
The next portion was an oblong plastic container. This is where your hand will go so we inserted a small piece of pipe and secured it from both ends with a screw. Later we realized we need a larger grip so added foam padding around the pipe. One more hole was cut to allow the strings in. Then, we used 3 screws to go through this, the drywall container and the lid of the hands base. This tied it all together and created a firm construct.
An access panel was cut in the bottom of the container so it would be easier to attach the finger controls. Velcro was affixed to allow easy removal. You can see the foam padding around the grip.
And here are our three finger controls.
To cover our claws, we cut three pieces of foam for each upper finger tip (the nail, side and front) and two pieces for each second joint. Here are the pieces for the two finger tips.
The teardrop piece gets affixed to the front of the finger like so.
Use a heat gun to warm the foam, curve it while applying heat and the finger nail will retain the shape. Affix the side piece to the nail. This will be to the outside of the two top claws.
A large cardboard tube was cut to hold the forearm secure. A double piece of foam was cut to the shape of the bottom container and hot glued in place. The tube goes all the way up to the wearers elbow.
To create armor plating, we used the interlocking heavy duty foam floor mats. These can be cut with a razor knife or an xacto blade. If you can't find these second hand, they can be purchased at most hardware stores. You can get 4 squares for approximately 20 USD. So be sure to measure twice and cut once. We used many heavy paper or cardboard templates before cutting the foam.
Everything was primed in black and final preparations were mad for finishing details. Here's where our pressure gauge will be attached.
We cut a piece of thick foam matte to cover the area and provide a place to insert the gauge.
We picked up an inexpensive gauge for a dollar at a garage sale. here we have removed the guts from the metal cover.
We then printed an old gauge face onto some cream paper to look older. Push the pins through the paper and glue it to the original face. We brushed some copper paint on the red needle and sprayed the case with a metallic bronze. We also scuffed up the plastic lens with sand paper to make it feel older.
Here you can see where the gauge will be inserted and the armor plating affixed to the back of the hand. We used hot glue which when painted will resemble weld lines. Large screws were also attached to sturdy it up and for the steampunk look.
Opposite the gauge we attached some adjustment gears.
These last few parts will create the end of the steam tank on the side of the power claw. The elbow and nozzle will be the pressure relief valve.
For a final touch we cut a second armor plate to go over the first and carved an imperialistic crest into it with a hot knife.
The interior of the fingers and underside were painted with a satin black finish. Once dried, we sprayed the tops of the claws and rest of the exterior with a hammered metal finish spray paint.
Here is the gauge in place..
the tank with pressure relief valve...
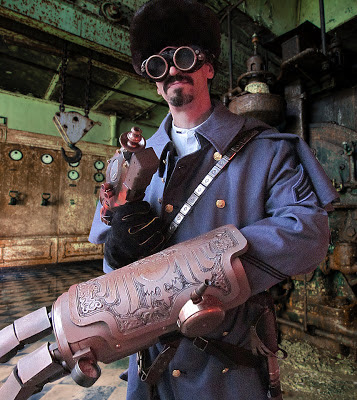
the final claws painted and articulated
and the underside with access hatch
We had a blast building the power claw for our Vostroyan Steampunk costume and had a great time crushing our enemies to little tiny pieces!! We hope you enjoyed the series of posts and plan to show you one more How To tutorial on the rifle that was also built to complete the outfit.
Please let us know your thoughts and feel free to ask any questions if we didn't explain it well enough. We learned a lot during the building process (like Gorilla glue doesn't work well on plastics) and I'm sure any of you who attempt this will too!
So get out there and have a great battle!
The Old Crow


I think that I'm going to take this project on. The clear bucket that you used, I read 'Magic Erasers' on it. Where can I find one of those? Thanks on advance and love the arm!
ReplyDeleteThe "Magic Eraser" is a cleaning product and if you buy the 10 pack you get the nifty container. Here is a link for one on Amazon: http://www.amazon.com/Clean-EXTRA-POWER-Magic-Eraser/dp/B0017SJA2S
DeleteYou can always try another container you may have lying around. Garage sales are another way to pick up odd shaped containers.