Wednesday, January 30, 2013

How to Build a Trebuchet for Warhammer or Historical Wargames

How to Build a Bretonnian Trebuchet for Warhammer
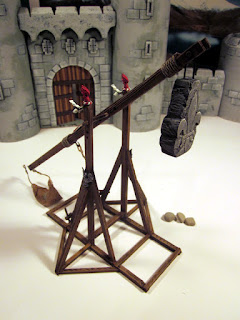
OK siege warfare fiends, Part Two, how to build a Trebuchet for playing Warhammer or any other historical war-games. We are making a Bretonnian Trebuchet for the defense of the keep or attacking those pesky Empire Counts. For historical purposes, simple traction trebuchets can be used as early as the 8th century and more complex counterweight trebuchets through the 12th century up to the 15th and 16th centuries.

How to Build a Trebuchet for Warhammer
We started by assembling various sticks to use for the boards. The base was cut 6 inches (15.25 CM) long and 2.5 inches (6.25 CM)wide. The sling arm is 11 inches (28 CM) in length. The height of the uprights is 6 inches (15.25 CM)

How to Build a Trebuchet for Warhammer
We drilled 3 holes in the arm so it could be adjusted forward or back. Holes in the uprights were drilled to match. The arm was made from 3 pieces glued together. The hemp twine was used to wrap around the arm for support.

How to Build a Trebuchet for Warhammer
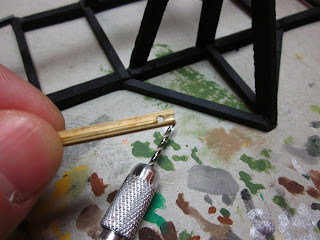
To create the winch to crank the arm down, we drilled a hole in either end of a small dowel with a pin drill. Make sure the holes are through at a 90 degree angle to each other.

How to Build a Trebuchet for Warhammer
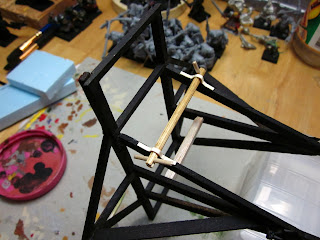
Insert a round toothpick in both holes and clip them off at about half an inch or 1.25 CM. We used thin cardstock strips to attach it to the angled support. This will mimic metal brackets holding it together.

How to Build a Trebuchet for Warhammer
Now the weight for our trebuchet. This will be for a proud Bretonnian Duke so will display the fleur-de-lis. We did a quick sketch and being as this will be a model for gaming, decided to carve it out of foam.

How to Build a Trebuchet for Warhammer
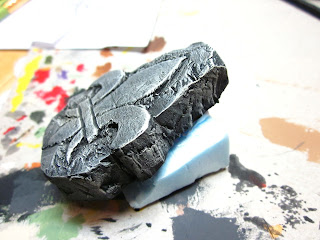
Here is the stone carved with the fleur-de-lis.

How to Build a Trebuchet for Warhammer
We primed it black and added a layer of dark gray for the first coat.

How to Build a Trebuchet for Warhammer
Next use a medium gray and finally a drybrush of light gray.

How to Build a Trebuchet for Warhammer
Using a warm white, highlight the edges of the  fleur-de-lis and outer edges of the stone.

How to Build a Trebuchet for Warhammer
Drill a hole through the two back supports of the arm and insert a small dowel or round toothpick for a pin. Use a heavy gauge wire make a long U shape, place it over the pin and push it down into the foam.

How to Build a Trebuchet for Warhammer
We used a cotton string to wrap around the winch. Apply a coat of glue to the winch to affix the string. Hemp twine could be used again, we chose to differ the cords for variety.

How to Build a Trebuchet for Warhammer
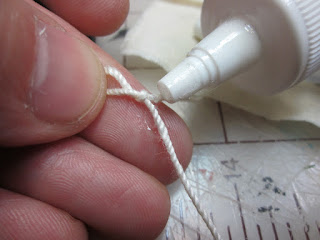
We then made a small loop on the other end, applied a touch of glue and wrapped the tail around the rest of the string.


How to Build a Trebuchet for Warhammer
Then drill another hole below the arm support and insert a piece of curved wire. The loop was slipped over it and the remainder of the wire loop was pushed in to secure it in place.

How to Build a Trebuchet for Warhammer
At the top of the arm, drill two small holes. One in the top and one on the underside just down from the top. The one on the bottom will also be curved to hold the bottom of the sling in place. The top wire is only bent slightly forward to allow the top loop the ability to release, thus hurling the contents upon thy enemies head!

The sling was cut from a small piece of fabric. Using a healthy amount of glue, wrap the same type of string around each end of the cloth. Allow enough string to add loops to both ends as we did for the winch.
As mentioned above, the bottom hook is attached with the loop of string in place.

How to Paint a Trebuchet for Warhammer
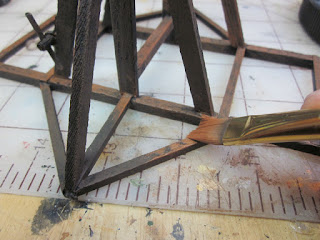
Now onto painting the body. Everything was primed in black and the first coat of color was burnt umber. Any dark brown will work.

How to Paint a Trebuchet for Warhammer
Make sure to coat the twine used on the arm supports.

How to Paint a Trebuchet for Warhammer
We wanted to go with a warm wood tone instead of a faded look so went with Nutmeg, a reddish brown, for the second coat. Use a wider flat brush and apply the color across the sticks. This allows some of the crevices to retain the darker colors already applied.

How to Paint a Trebuchet for Warhammer
 Here's the body once the nutmeg was finished. You can see the black and dark brown showing through, creating shadows and extra depth.

How to Paint a Trebuchet for Warhammer
The entire trebuchet was then given a light coat of Golden Brown and then a finish light drybrush of Tan. This last step will go a long way to making the recesses pop out nicely.

A good coat of tan was applied to the twine binding the arm together and a final drybrush of Warm White was applied to finish the "rope supports".

How to Paint a Trebuchet for Warhammer
A few details were added to the trebuchet, so lets get to them. On either side is a winged dragon which we decided would be bare metal work. Each was painted Gunmetal and highlighted with Aluminium. The winch supports were given the same treatment.

How to Paint a Trebuchet for Warhammer
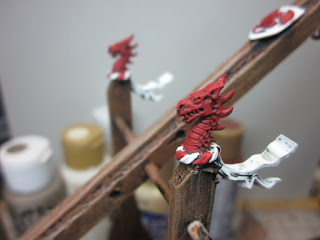
On the top of each upright we placed dragon heads with banners coming off the bottoms. We painted a rough coat of Clay Bisque over the bottom and banners.

How to Paint a Trebuchet for Warhammer
The dragon heads were painted first with Brick Red...

How to Paint a Trebuchet for Warhammer
secondly a coat of Tomato was applied. We also painted every other twist in the banner fabric around the dragons base.

How to Paint a Trebuchet for Warhammer
A final light coat of Napthol Crimson brightened them up. The banners had a final coat of Warm White as well.

How to Paint a Trebuchet for Warhammer
There is a shield with a dragon emblem on the trebuchet arm that was painted with a white field and red dragon. We used the same three reds on the shield. Here you can also see the finished metal dragon on the side.

Scratch Built Bretonnian Trebuchet
The sling, attached strings and winch strings were all given a wash of Burnt Umber. The strings all had a drybrush of tan and a highlight of Warm White. Then we added some projectiles.

Scratch Built Bretonnian Trebuchet
And there you have it. A fabulous and devastating trebuchet to aid your siege towers approach to castle walls.

Scratch Built Bretonnian Trebuchet
The Bretonnian fleur de lis stone weight can be replaced by any other carving you prefer. Or for something more historical, a large wooden bin filled with rocks.

Scratch Built Bretonnian Trebuchet
Once again, we hope you enjoy the tutorial and your trebuchet. Drop us a comment and let us know what you think!

Have A Great Battle,
The Old Crow

Sunday, January 27, 2013

The Hobbit Advance Orders: Elrond, The Knights of Rivendell and Grim Hammers

Games Workshop has more from the Hobbit ready for Advance Order! Place you order tonight (Sunday Jan 27th) for Elrond, The Knights of Rivendell and Dwarven Grim Hammers. You can have them delivered to your local hobby center for pick up on launch day, Saturday February 2nd. You can also have your miniatures shipped to any other address, just place your order by Wednesday January 30th, and they'll ship it on Friday February 1st. Orders placed after the 30th will be shipped on Monday February 4th .

The Hobbit an Unexpected Journey: Grim Hammers
If you have seen The Hobbit an Unexpected Journey by now, you should have been impressed by the ranks of stalwart Dwarven defenders of Erebor. OK they were crushed by a dragon, but they did look great before that.

The Hobbit an Unexpected Journey: Grim Hammers
These Dwarf warrior miniatures are shod head to toe in gleaming battle plate and shining mail.

The Hobbit an Unexpected Journey: Grim Hammers
In the box set you get twelve Grim Hammers. Stout and sturdy figures who come appropriately equipped for defending the halls of Erebor.

The Hobbit an Unexpected Journey: Grim Hammers
Each wears chainmail and is covered from beard to toe in heavy armor  Each model takes a unique pose, swinging their pick hammers or sharp axes at different angles.

The Hobbit an Unexpected Journey: Grim Hammers
Their glorious beards hang down underneath masked helmets.

The Hobbit an Unexpected Journey: Grim Hammers
This plastic kit contains 30 components and twelve 25mm round bases with which to make twelve Grim Hammers. It retails for 35.00 USD.


The Hobbit an Unexpected Journey: Elrond
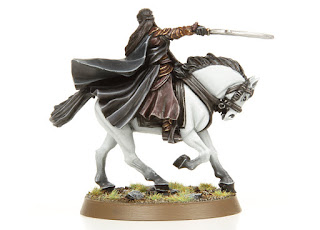
Elrond is featured in two different ways. On one he rides his horse into the melee, his long sword extended and his expression is one of battle-hardened rage. The other model features him on foot, though wearing the same long, flowing robes and elegant armor across his upper torso. He stands on foot, holding his sword aloft with two hands, ready to strike his foe.

The Hobbit an Unexpected Journey: Elrond
This finely detailed resin kit contains five components, a 40mm round base and a 25mm round base with which to make Elrond on foot and mounted on horse. It does retail at a steep 40.00 USD

The Hobbit an Unexpected Journey: Knights of Rivendell
An elite band of warriors formed of the nobles in Elrond's house, the Knights of Rivendell are formidable cavalrymen. 

The Hobbit an Unexpected Journey: Knights of Rivendell
Their devastating charges leave shield walls in tatters, whilst their nimble steeds can weave and dodge through even dense woodland with ease.

The Hobbit an Unexpected Journey: Knights of Rivendell
You'll get six highly dynamic Knights of Rivendell miniatures in this bow set. They are a beautiful addition to any The Hobbit: An Unexpected Journey collection. 

The Hobbit an Unexpected Journey: Knights of Rivendell
With their cloaks billowing around them, they wearing elegant Elven armor and carry ornate shields, and long lances - though there are also options for one to carry a banner or a war horn. 

The Hobbit an Unexpected Journey: Knights of Rivendell
They come in multiple poses, each one a variant of a Knight of Rivendell riding their steed into battle. 

The Hobbit an Unexpected Journey: Knights of Rivendell
The kit also comes with casualties, to denote a fallen Knight of Rivendell.

This plastic kit contains 54 components and six 40mm round bases with which to make six Knights of Rivendell.

The kit is a great set of figures, but it will set you back 50.00 USD retail. As much as we love these miniatures, we find Games Workshop to be pushing the pricing as to be out of reach for new hobby enthusiasts and souring the taste of the older ones

Have a Great Battle,
The Old Crow

Tuesday, January 22, 2013

How to Build a Warhammer Siege Tower


How to build a Warhammer Siege Tower
 If you have a rough game of Warhammer where the opposing force has a castle, a siege tower is a necessity. After starting our own castle it was apparent we’d need some good siege equipment to lead the attack. We thought a good battering ram would be handy, definitely a catapult or trebuchet and lastly a siege tower or two.

How to build a Warhammer Siege Tower
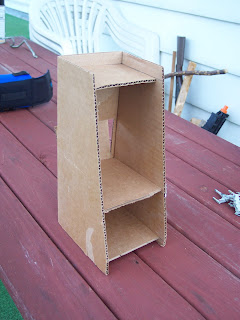
Cardboard was plentiful, so the siege tower began. We took several measurements, wall height, archer height and base width etc. The tower would need to be tall enough to drop invaders off on the wall and provide cover fire for a successful storming of the castle!

The side walls are 10 inches tall, 5.25 inches wide at the bottom and 3 inches wide at the top. It measures 4.25 inches across the front.

How to build a Warhammer Siege Tower
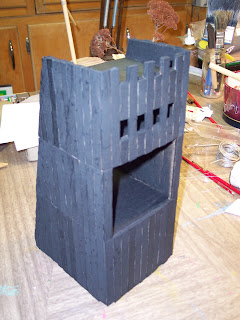
We cut the sides at an angle to provide a wider base and once the outer wall was in shape we cut 4 floor pieces. The first for the base, the second for the men attacking once the tower door dropped, third for the first level of archers and then the top for another supporting rank of archers. We cut out the door and one window the width of the tower for the arrow slits. Don't bother trying to cut out each arrow slot, we'll take care of that in the next step.

Remember to measure twice or even thrice and then cut. Once the floors were glued in, Elmers or craft glue will work, we could start the covering. Remember, always check your measurements before the glue gets applied.

How to build a Warhammer Siege Tower
We cut three successive levels of craft sticks to size with a hobby knife and cut chunks out of the sides to give it a less uniform appearance. We glued tall vertical craft sticks over the one window to form the arrow slits in the middle of the tower.

How to build a Warhammer Siege Tower
Cutting the angles can be difficult, be careful not to split the sticks, but if you do hang onto them for now. Use several light successive cuts to score the stick and eventually you’ll get through it.

Balsa wood can be used in place of the craft sticks and is easier to cut. Balsa will also cost you a bit more. Remember knives can cut through a finger pretty cleanly. Have a friend that knows first aid over just in case.

How to build a Siege Tower
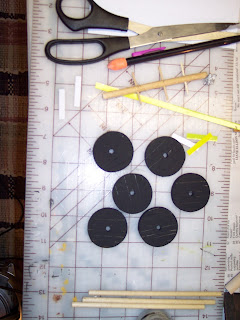
On to mobility. We planned three large wooden wheels shod in iron bands for each side. We found some 1.5 inch wooden disks in a bargain bin at a local craft store and decided they were the perfect size.

How to build a Siege Tower
We took the craft stick pieces and cut some additional ones. Glue them side by side on the disks.

Using the hobby knife score the sticks from around the back of the disks to create the basic wooden wheel.

How to build a Siege Tower
Measure the thickness and circumference and using a thin card-stock , we used a box from the Madagascar red tea we just finished, wrap it around your wheel and thoroughly glue it on.

How to build a Siege Tower
Using a drill we cut holes in the center of each wheel for the axles which were cut to size from a long dowel.

Here they are primed and ready to be attached.

How to build a Siege Tower
For the door to drop open, we glued on a coffee stirrer and pinned it in using round toothpicks so it would fall open. Screw a couple tiny eyelets onto the inside beam of the door for the “chain” to hold it in position. A couple more on the bottom of the floor above allow it to pull up to a closed position. I scored a great little piece of technology while recycling some old electronics which had two spindles with thin copper wire. We ran the copper wire through the top eyelets and attached them to the door. This allows us to crank the door up and down.


How to build a Siege Tower
After everything was ready we primed it all black. Successive layers of browns were brushed on starting with burnt umber, then coffee bean and finally nutmeg.

Warhammer Siege Tower
Highlights were dry brushed with beige along the edges.

Now we load it up with attackers, deliver them safely onto the wall and storm the castle!!

Orcs attacking castle with Warhammer Siege Tower
As you can see in our cover shot, the orcs have brought along a giant to assist in moving the tower. Here is a nifty view of the back of the tower. The bottom two levels have the orc boyz loaded and ready for action. The top two levels have supporting ranks of archers.

Orcs attacking castle with Warhammer Siege Tower
Onto the walls!!

Drop us a comment and let us know how you liked this tutorial.

Orcs attacking castle with Warhammer Siege Tower
Until next time,
Have A Great Battle!
The Old Crow