Showing posts with label Dwarves. Show all posts

Tuesday, October 21, 2025

To Seek the Grail: A Pathfinder Quest

Halfling Hero

These are the true and just writings of Alton Goodbarrel halfling extraordinaire and really sneaky Guy.

10/1212
It was just after dawn when Aramil of Hornwood, and I sailed into Bright-talon. The morning was filled with a mist and light rain that gently soaked our gear. We knew we had a long walk ahead of us, so bid our captain farewell. After a quick bite at the tavern, we headed west through the Silver Moon woods to meet the rest of our party at River Run.

Our day's travel was easy and we arrived in River Run before dark. Aramil is a quite jovial wizard, especially for a half-elf. We were glad there were no troubles through silver Moon woods.

At the tavern we found Sir Ferrik, a beast of a Paladin who radiates holiness, and Ollum Hammersong, Mace of Smiting in hand, waiting for us. Aramil has known both of them longer than I have, but they are beginning to grow on me. After our last couple of adventures I've come to like Ollum and the way he constantly plucks the strings of his lute and sings his dirges. He's also the best dwarf cleric I've ever met.

A Quest begins
Ferrick actually troubles me deeply. I find that I have a hard time with my language around him. I also feel bad picking pockets when he's nearby. It's those stern looks that he gives me. But I also wouldn't go into any dungeon without him. He has a magical lion shield that bites people.

After catching up with the two of them. We retired for the night and hoped that Shamysh would get there early enough for following day for us to make plans.

12/1212
Well it took an extra day, but he arrived. Shamysh always gives me the creeps. Those clawed feet and the beak, still can't get used to traveling with a tengu. And those beady eyes, like they were staring right through you. He says as a ranger it really gives him keen eyesight. I still think he's creepy. Also have to remember to stand back when he's swinging that battle ax, he sometimes gets carried away. 

Grail Quest Map
In the meantime, we've heard a lot of talk from the locals about some trouble that could be happening at Greencrest. We had planned on heading north to the mountains to try to track down some old monk near the peaks of Sunfield. Anyway, from what we gather, there haven't been any deliveries for the last week from Greencrest. Nobody else seems to want to go see what could be wrong. Apparently, there would be at least three or four deliveries of goods from Greencrest every week. 

I've talked to the village elders myself, and it seems possible there might be some type of reward. If we could go figure out what's happening for them. They won't commit to anything specific. Shamysh feels that the road to Greencrest would be a much easier trip for all of us rather than traipsing through rivers, streams, woods and mountains to get to Sunfield. His screeching laugh is also creepy.

13/1212

Well it looks like we're headed to Greencrest. I've secured a small fee for our troubles. And they assure us that the elders in Greencrest and the Earl of the Manor would probably be very generous if we were to help them with any troubles. Aramil seems to remember a story of some type of magical item that peasants take pilgrimages to Greencrest to see. Sounds promising.

14/1212
Camped on the edge of the Silver Moon woods last night. Really nice trees. Should reach Greencrest by this evening. I sure hope the ale is good there. 

Fight over the bridge
14.6/1212
Great Gorum! What a night. So much for ale. A mile or so outside of town, we could see wisps of smoke. Fires must have been burning for a while. When we got to the outskirts of town we could see the devastation. Once we crossed the bridge into town, we were immediately attacked by a band of hyena like dog people. Shamysh called them kholo, Ferrik called them gnolls. I just call him ugly. 

We killed all but one of them, who ran and locked himself into the town's Tower. We left Ollum keeping an eye on him well we examined the rest of the town.

Fight in Greencrest
Every building was burned out and every corpse we found was pretty similar. We did manage to find
villager with a bit of life left in him. Thanks to Ollum and Sir Ferrik they got him conscious. He describes some terrors and a billowy floating creature. I don't know that I want to meet that. But he did also inform us that there was a magical relic at The Manor House. Unfortunately, the house was burned out. I was able to locate a secret compartment that had a very intricate mechanism, the kind that I would only pay for if I had something very valuable.

Tower escape
While we were at the manor house, Ollum Saw the last Kholo run from the tower and head west out of town. The tower is still intact, but filled with dead militia and another creature that does not appear to be human. So we will bar the door and try to get some rest. No ale anywhere 


15/1212
Shamysh told us on the third watch he saw the shape of a horse and rider head out of town, also in the general direction of west. 

Guess where we are going. Did I already mention that We'll be traveling along the marshes of dread.

16/1212
Camped beside the road near a stream for the night. Lots of strange noises. Glad we didn't get to meet whatever was making them. Should make it to the town of Brightrest before the end of the day.

16.7/1212

Guards at Brightrest
Made it! Guards were surprised to see anybody coming from Greencrest. There hasn't been anyone visiting Brightrest from that direction. Filled the guards in on the devastation. We'll be meeting with the town elder tomorrow morning. Tavern is comfortable, pheasant was overcooked, meade mediocre

17/1212
Met with Rymond Sunsera, village elder and floppy hat wearer. He's going to organize a relief/scouting expedition to Greencrest. He was very helpful with all our questions and knew of a tower or keep type ruin in the woods North West of town. Said it wasn't as far as the mountains and is a couple days march. He also sent for a guide who has actually seen the place. Woodsman dwarf known as Olaf Greybeard. Rymond also verified the existence of a holy relic that used to reside at the Earl's Mansion back in Bright rest. If it were to be found, he believes one of the main temples in Galmoth would pay handsomely for its return.

17.2/1212
Met Olaf. He doesn't sound like he wants to visit the place. He saw an ethereal black billowy thing float from tower to tower, no bridge. Just floated across. Could be what the villager saw. After questioning other townsfolk, seems like everybody knows someone that went to find this place and never returned. We'll stock up on provisions and yep you guessed it go where no one comes back from. 

18/1212
We have joined an entourage of town guard and what appears to be a cleric from town. They have a wagon loaded with provisions and other helpful items for whatever they might find in Greencrest. We'll travel with them until Olaf takes us off into the woods.

Camping north of the Marshes of Dread

18.6/1212
Set up camp for the night. We'll be setting off on a trail through the woods in the morning.

19/1212
Well, can't say I never saw a skeleton riding a skeletal horse again. What a nightmare. Fortunately, Ferrik and Shamysh were able to dispatch him. Ollum got a few hits on him and Aramil’s magic missles hit too.

Olaf tells us we should try and get a good night's rest. We will need it tomorrow.

20/1212
Overlooking the valley. There is a very ominous looking tower structure down there, two side towers and several other buildings scattered about. All the buildings are in a state of disrepair. We will have to plan our steps carefully. Olaf is going to wait back at our previous campsite. Hopefully I'll get to write more later. 

21/1212
That was a wild ride. We all made it, thanks to my skillful location of enemies! Once in the valley, we approached cautiously. As we maneuvered, we were set upon by creatures known as ghouls. I've never seen a dead thing. Move so fast. Sir Ferrik was able to bless them into oblivion! And Aramil use a good bit of fire and magic missiles to keep them at Bay. Most of them attacked us with claws and Jaws. There were several used wicked looking two-handed swords. These seemed a little bit tougher. I was able to sneak around behind them and locate several additional ghouls the guys to take care of.

Once the ghouls were cleared out, I was able to locate several skeleton archers in the towers. They were a little tougher to deal with. Sir Ferrik and Shamysh were able to bless some arrows, and set about finding good spots to shoot back. I led Aramil and Ollum up around one of the side towers where we thought we saw an entrance. we did find the entrance. It just happened to be guarded by two armored skeletons. My blade seemed ineffectual.

Ollum's Mace on the other hand, did a fine job at knocking their blocks off. Aramil was able to lend a hand with a few more magic missiles. It was touch and go so I snuck around the other side of the Tower and climbed up to the second floor. By the time I got back down inside, Shamysh and Sir Ferrik had gotten there and helped Ollum finish them off.

Crossing the bridge

After searching the area, we moved up two floors and found the bridge leading to the main tower. We carefully approached what used to be the entrance on the other side. I was able to sneak in to scout the area out. Nothing else seemed to be moving. Ollum had noticed that the stonework appeared to be Master craftsmanship, better than even some dwarves could do. It does lead us to wonder who could have created this place and worse than that who could have destroyed it?

We worked our way down to the main floor. There we found a hatch into a lower level. It was pretty dark but all he could see writing on the floor below with torch in hand. We dropped down and found magical inscriptions scrawled up on the floor. Aramil did that magic stuff that he does and before we knew it there was a glowing ring where a secret stone in the floor was located with the help of Shamysh's adamantium battle ax, we were able to pry it open. 

It was a tight spiral staircase leading down. And it was dark. Nice to know that Ollum can see in the dark! He was able to scout and let us know that there was an empty chamber at the bottom with doors leading out in opposite directions. Aramil was able to conjure up a flame that he put on the end of his staff. This was able to light the way for the rest of us. 

What was actually at the bottom was a main chamber with a series of rooms to the right and left. Some with locked doors, some with hidden doors and several sarcophagi. It felt like the kind of place you would expect to find more dead things. We started with the rooms to our right.

At a dead end, Ollum noticed stonework with an indentation. And it just so happens that I had located a key and a small pool of water in the corner of a nondescript room. Turns out the indentation was a keyhole. Inside the secret chamber we found a pedestal containing a small chest. Once I cleared it for traps, we were able to pry it open and found several items of value, including an amulet and a ring.

Cave Troll fight!

After heading back to the main chamber, we moved in the opposite direction and found a similar setup of rooms but this time there were sarcophagi. We left the first one be so we wouldn't make noise in removing the stone lid. Especially when Sir Ferrik and Ollum both detected evil emanating from the hallway to our left. Down the hallway to our right, at the end of the series of rooms, there was a large double door. Sir Ferrik and Shamysh were able to muscle it open where we discovered another sarcophagus. We decided to try to open this one and attracted the attention of two large cave trolls. Fortunately, the first one was almost wounded by the time the second one arrived. It was a team effort to finally slay them. Once dispatched, we were able to get the sarcophagus open and found the remains of a knight. Ollum stood on the edge of the sarcophagus, mace in hand, in case the thing might become animated. We carefully extracted anything of value and stowed it amongst our gear.

Wraith encounter
Finally, we were back at the other sarcophagus and decided to try “quietly” removing the stone lid. Didn’t work. Sir Ferrick raised the alarm as a floating billowy black form advanced down the hallway towards us. Never met a wraith before and I never want to meet one again! It was a hard fight, a hit paralyzed Ollum and Shamysh was knocked out of his wits. On the other hand, Aramil’s magic struck home and Sir Ferrick’s aura seemed to protect him and his attacks were devastating. It died at his sword stroke and it’s departing shriek will chill my bones for days.


Dungeon of the wraith

Sir Ferrick and Ollum used their healing magic on all of us. After feeling better we did find a couple objects of value in the sarcophagus. We then cautiously moved down the hall from where the wraith came. We discovered it’s lair with a few items of interest but still had not found the missing relic. In the ante chamber Ollum, thanks to his keen site of stonework, noticed another “indentation” in the wall. Sure enough the key I still had opened a second hidden chamber!

There it was, a dais on which sat an ornate box. Unfortunately, there was no apparent way to open it. No lock and no hinges. Using my expert analysis, I was able to find the opening mechanism and also a poison trap, which I disarmed. When the lid popped open, we found the Holy Relic, some jewels and a decent amount of coinage. Aramil encouraged us to vacate the premises.

24/1212
We found our way back to camp and reconnected there with Olaf. He was relieved to see us. We rested for an entire day and then headed back to town. We were warmly welcomed and given a celebratory feast. It was kind of just a small meal. Anyway, Rymond was in awe of our success and gave Ollum the name of a Senior Cleric in Galmoth who would “reward” us for the return of their holy relic. Aramil knows a shop there that can help us identify some of the magical items we cannot figure out.

All the posh folk took up a collection in thanks of ridding the town of such a terrible place. All in all we had a great adventure, our names are getting around and at Galmoth, who knows what could happen!


Saturday, December 21, 2013

New Release: The Hobbit: The Desolation of Smaug from Games Workshop

The Hobbit: The Desolation of Smaug

Games Workshop New Release of The Hobbit: The Desolation of Smaug!

This expansion provides a wealth of supplemental rules, which recreate the events of the film on your tabletop. This 64-page, full colour, softback expansion for The Hobbit: An Unexpected Journey includes:
· 8 brand new scenarios recreating the action-packed events in The Desolation of Smaug.
· Rules for linking your games with Thorin’s Company into a dynamic narrative.
· Rules for fighting in the realm of Mirkwood, and 3 new Points Match Scenarios.
· A gallery showcasing several hobbyists’ collections of Citadel miniatures, inspired by the warriors of Middle-earth and the events of the movies.
· An ‘Eavy Metal masterclass of Gandalf the Grey.
· Profiles and rules for the Good and Evil miniatures

This is an expansion so you will require a copy of The Hobbit: An Unexpected Journey Strategy Battle Game rules manual, or The Hobbit: Escape From Goblin Town boxed game, to use this expansion.

Now onto the new figures for your collection of Citadel miniatures.

The Hobbit: The Desolation of Smaug - Beorn
Beorn is the burly "skin changer" woodsman whose home is on the outskirts of Mirkwood. Beorn has the power to adopt the form of a bear that he so uncannily resembles.

The kit contains 3 components with which to make Beorn armed with a two-handed axe.

The Hobbit: The Desolation of Smaug - Thranduil King of Mirkwood
Thranduil, King of Mirkwood is a mighty king whose realm faces a dire threat in the rising power of the Necromancer of Dol Guldur. Beset from all sides, Thranduil maintains a vigilant guard upon his realm.

The Hobbit: The Desolation of Smaug - Thranduil King of Mirkwood
The resin kit contains 2 components with which to make Thranduil armed with an Elven blade.

The Hobbit: The Desolation of Smaug - Legolas
Legolas Greenleaf is the son of Thranduil and thus prince of Mirkwood. Legolas is an exceptional warrior, even by Elven standards. His skill with his bow ensures his father’s domain is kept safe.

The Hobbit: The Desolation of Smaug - Legolas
This plastic kit contains 5 components with which to make Legolas Greenleaf armed with a bow and 2 daggers. He is dynamically posed atop a tree trunk, poised to strike at any invaders of Mirkwood.

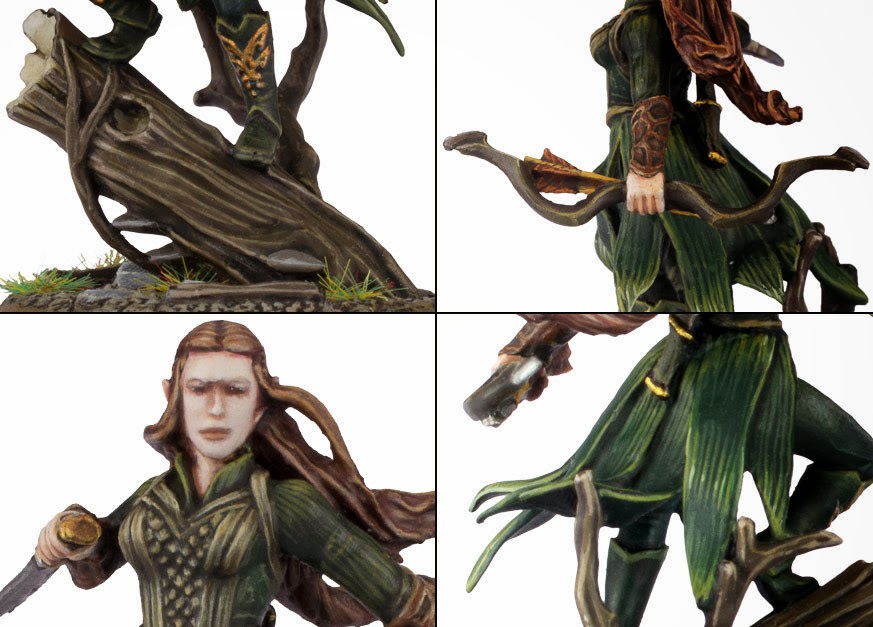
The Hobbit: The Desolation of Smaug - Tauriel
Tauriel is a warrior in the kingdom of Thranduil, a formidable fighter and ranger patrol leader.

The Hobbit: The Desolation of Smaug - Tauriel
Her status makes her an unlikely ally in the Dwarves’ quest to Erebor.

The Hobbit: The Desolation of Smaug - Tauriel
This plastic kit contains 6 components with which to make Tauriel armed with a bow and 2 daggers.


The Hobbit: The Desolation of Smaug - Barrells Out Of Bond
Barrels out of Bond literally contains the Dwarves of Thorin’s Company making their escape from the dungeons of Thranduil by hiding in the barrels and floating down the Forest River.

This resin kit contains 15 components with which to make Barrels out of Bond, containing all thirteen Dwarves of Thorin’s Company, and Bilbo Baggins™.

The Hobbit: The Desolation of Smaug - Mirkwood Rangers
Travelling through Mirkwood is a perilous undertaking. Mirkwood Rangers show no fear for they are hunters without peer and deadly warriors one and all.

The Hobbit: The Desolation of Smaug - Mirkwood Rangers
The contents of this box contains 23 components with which to make 10 Mirkwood Rangers, of which 5 are male and 5 are female. You can tell them apart, particularly by the fact that the female Elves have the curved bows.

The Hobbit: The Desolation of Smaug - Mirkwood Rangers
Each miniature is made in a fixed pose, and they are designed to look like skirmishers. Each model is armed with a bow and daggers.


As always, all of The Hobbit: The Desolation of Smaug kits come unpainted and require assembly.

Have A Great Battle!
The Old Crow

Friday, November 22, 2013

Old Glory Dwarf Canon for Warhammer Fantasy Dogs of War

Old Glory miniatures have been around for a good while and if you're looking for a deal they might fit the bill. Old Glory is also one of the few scale model makers located here in the states. In the old days Warhammer supported Dogs of War armies and many Regiments of Renown. One of these was a light caliber mobile canon called Bronzio's Galloper Guns. They were excellent models but are out of print and may be expensive to find on eBay or other venue.

However if you have a friendly gaming club that allows you to play old school, Old Glory makes a dwarf horse canon that fits the bill. This model is a smaller canon than most dwarven artillery and comes with the horse and a crew of four. We left the horse out of our photo, sorry. We also swapped out the smaller metal wheels for larger plastic spares we had available.

Here we started basing the cannon with black and used Burnt Umber on all the woodwork. The dragon heads were painted with a base of Burgundy.

A lighter coat of Raw Umber was then applied to all the woodwork.

Last step for the wood was a light drybrush of Territorial Beige. The metalwork was given a coat of Antique Bronze and drybrush highlights of Pure Bonze.

The steel shod wheels were painted first with Gun Metal and then highlighted with Aluminium.

The canon barrel was painted with Pure Bronze.

We then applied a black wash to bring out details and last touches of highlights to the woodwork and metals.

The crew consists of a pirate captain and three stout dwarf warriors. Here they are with base coats and most details applied.

Finally based and in their "Old Glory". Maybe next time we'll show you how to build an artillery emplacement for any of your cannons.

Have a Great Battle!
The Old Crow


Sunday, April 28, 2013

Ruglud's Armoured Orcs Dogs of War Unit Completed!

Ruglud's Armoured Orcs Dogs of War Unit
Last summer we did a post on How to Build Ruglud's Armored Orcs and never showed the finished models. Well today we rectify that error. Here they are in all their orcyness. The entire unit works well together and all have collected their mementos from past battles.
Ruglud's Armoured Orcs Dogs of War Unit
We'll review the individual models in the order we showed you in the previous post.

Here are the first two of Ruglud's boyz, both have items raided from the lizardmen across the pond in Lustria.

Ruglud's Armoured Orcs Dogs of War Unit
Next the veteran from the Dwarf Wars sports a miners pick.

Ruglud's Armoured Orcs Dogs of War Unit
This orc boy has some chaos warrior armor and sword.

Ruglud's Armoured Orcs Dogs of War Unit
Sporting a dwarf shield as a breast plate.

Ruglud's Armoured Orcs Dogs of War Unit
More dwarf mementos

Ruglud's Armoured Orcs Dogs of War Unit
These guys have some chaos and Empire memorabilia...

Ruglud's Armoured Orcs Dogs of War Unit
... and additional items from Lustria

Ruglud's Armoured Orcs Dogs of War Unit
And lastly as I mentioned, my favorite raided a Tomb King treasure trove and brought the kings head back to prove it.

Ruglud's Armoured Orcs Dogs of War Unit
Kings shield carried on his back too.

Ruglud's Armoured Orcs Dogs of War Unit
So there you have them all individually and together!

Have a Great Battle,
The Old Crow

Sunday, January 27, 2013

The Hobbit Advance Orders: Elrond, The Knights of Rivendell and Grim Hammers

Games Workshop has more from the Hobbit ready for Advance Order! Place you order tonight (Sunday Jan 27th) for Elrond, The Knights of Rivendell and Dwarven Grim Hammers. You can have them delivered to your local hobby center for pick up on launch day, Saturday February 2nd. You can also have your miniatures shipped to any other address, just place your order by Wednesday January 30th, and they'll ship it on Friday February 1st. Orders placed after the 30th will be shipped on Monday February 4th .

The Hobbit an Unexpected Journey: Grim Hammers
If you have seen The Hobbit an Unexpected Journey by now, you should have been impressed by the ranks of stalwart Dwarven defenders of Erebor. OK they were crushed by a dragon, but they did look great before that.

The Hobbit an Unexpected Journey: Grim Hammers
These Dwarf warrior miniatures are shod head to toe in gleaming battle plate and shining mail.

The Hobbit an Unexpected Journey: Grim Hammers
In the box set you get twelve Grim Hammers. Stout and sturdy figures who come appropriately equipped for defending the halls of Erebor.

The Hobbit an Unexpected Journey: Grim Hammers
Each wears chainmail and is covered from beard to toe in heavy armor  Each model takes a unique pose, swinging their pick hammers or sharp axes at different angles.

The Hobbit an Unexpected Journey: Grim Hammers
Their glorious beards hang down underneath masked helmets.

The Hobbit an Unexpected Journey: Grim Hammers
This plastic kit contains 30 components and twelve 25mm round bases with which to make twelve Grim Hammers. It retails for 35.00 USD.


The Hobbit an Unexpected Journey: Elrond
Elrond is featured in two different ways. On one he rides his horse into the melee, his long sword extended and his expression is one of battle-hardened rage. The other model features him on foot, though wearing the same long, flowing robes and elegant armor across his upper torso. He stands on foot, holding his sword aloft with two hands, ready to strike his foe.

The Hobbit an Unexpected Journey: Elrond
This finely detailed resin kit contains five components, a 40mm round base and a 25mm round base with which to make Elrond on foot and mounted on horse. It does retail at a steep 40.00 USD

The Hobbit an Unexpected Journey: Knights of Rivendell
An elite band of warriors formed of the nobles in Elrond's house, the Knights of Rivendell are formidable cavalrymen. 

The Hobbit an Unexpected Journey: Knights of Rivendell
Their devastating charges leave shield walls in tatters, whilst their nimble steeds can weave and dodge through even dense woodland with ease.

The Hobbit an Unexpected Journey: Knights of Rivendell
You'll get six highly dynamic Knights of Rivendell miniatures in this bow set. They are a beautiful addition to any The Hobbit: An Unexpected Journey collection. 

The Hobbit an Unexpected Journey: Knights of Rivendell
With their cloaks billowing around them, they wearing elegant Elven armor and carry ornate shields, and long lances - though there are also options for one to carry a banner or a war horn. 

The Hobbit an Unexpected Journey: Knights of Rivendell
They come in multiple poses, each one a variant of a Knight of Rivendell riding their steed into battle. 

The Hobbit an Unexpected Journey: Knights of Rivendell
The kit also comes with casualties, to denote a fallen Knight of Rivendell.

This plastic kit contains 54 components and six 40mm round bases with which to make six Knights of Rivendell.

The kit is a great set of figures, but it will set you back 50.00 USD retail. As much as we love these miniatures, we find Games Workshop to be pushing the pricing as to be out of reach for new hobby enthusiasts and souring the taste of the older ones

Have a Great Battle,
The Old Crow